

 ホーム
ホーム ブログ
ブログ アクセス
アクセス3Dプリントアトリエ
先週この小さいプールにまた行ってみました。2年間前にも行ったんだけど、前から全然変わっていないそうです。阿蘇市の方々も知らないだそうですので、素敵な景色を楽しみながら泳ぐこともできます!
Last week I took a little drive to Sensuikyo Gorge, on the north side of the Aso volcano. I last visited this spot a couple of years ago, and I'm happy to report that this lovely little pool still exists. It's ideal for a refreshing dip on a hot summer's day, and nobody seems to even know it exists - not even the locals!

▲ 下を見ると景色がこんな感じです!仙酔峡の駐車場から300メートルほど上になります。
It's a little hard to find (map shown below for you) and a short 300-metre hike up from the nearest car park, but this is the view from the pool itself, looking north towards Aso city. Those mountains waaaay in the distance are the Kuju mountains, about 30mins drive north of Aso.
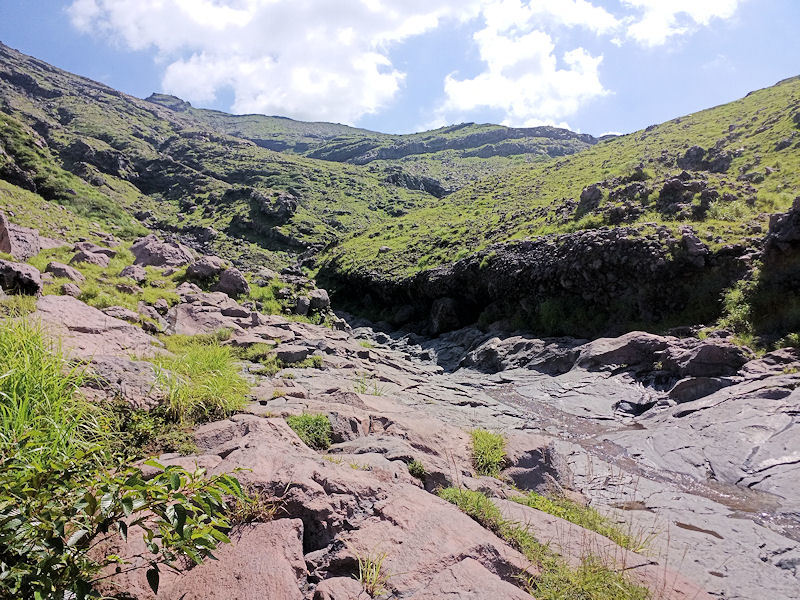
▲ 上を見ると阿蘇山が見えます。阿蘇山の中岳が結構近いですね。
水が溶岩石の上に通りますので、夏の晴れている日だったら落ちてくる水もちょっとお湯のシャワーみたいな感じになります。
And this is the view south, looking up behind you to the Aso volcano. The actual central crater of Aso (called Nakadake) is only about 1km from the pool, which is why you'll usually see these clouds of ash and vapour popping up above you!
The pool itself is not a geothermal pool, so the water is cold. However, the thin stream of water coming from above flows over these lava-rocks, and on a hot summer's day those rocks are warm from the sun's rays.... which means you get a small shower of warm water pouring into the pool! Really lovely.
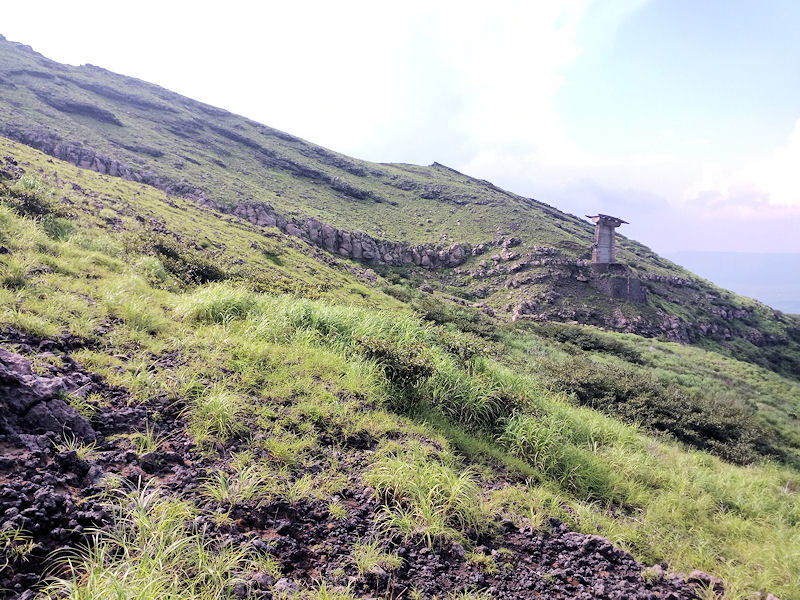
▲ 仙酔峡の駐車場から、この古いケーブルカー柱の高さまで登らないといけないんです。15分ほどかかります。
Okay, here's how to find it..... you'll need to park at the Sensuikyo car park below (which does have public toilets and some drink machines), and then hike up the steps and path for about 15 minutes. Once you get to the height of this disused cable car tower (on your right), turn left off the path.

▲ ハイキング道路からも見えないプールですが、この写真の所に来たら1分です。
This is the view left from the path. Although you won't be able to see it from the path, there's actually a small stream running just out of view, and you want to aim for the jagged slope in middle of this photo. You'll need to walk about 1 minute off the path to find it.
地図:
Have fun!!
まだまだガレージ工事が半分しか完成していないんですが、これから早くできそうですね!壁のフレームができましたので、次は屋根のフレームですね。。。
The garage is about half-finished now, but thankfully all of the hard, backbreaking jobs are pretty much done, so everything should move along quite quickly from this point. The wall frames have all been bolted together, so the next part of the build is to add a roof frame....
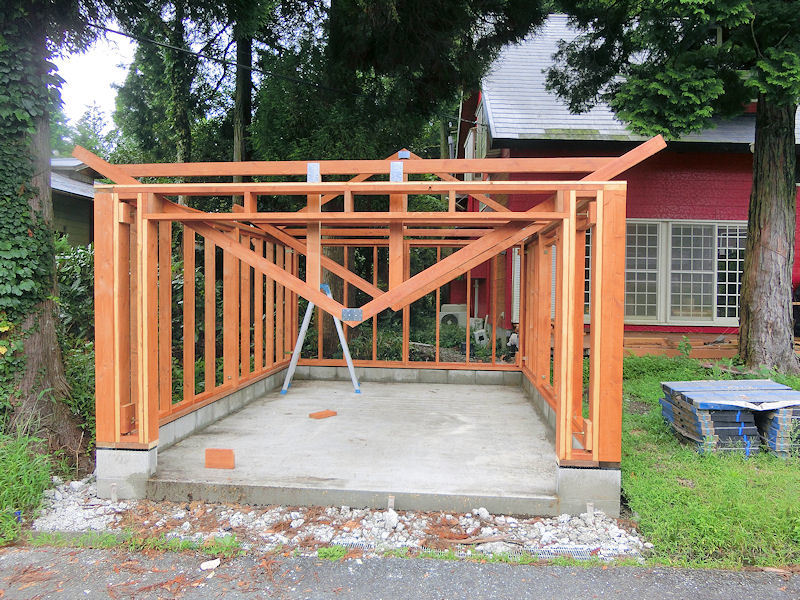
▲ 屋根のフレームも安いツバイフォー(2x4s)でできています。簡単な三角な形なので作成は結構簡単でした。ただし、載せるのは一人ではちょっと難しかったので、誰かが手伝いできる日まで一応壁フレームの家に載せました。
The roof trusses were put together using reasonably cheap 2x4s, although this did require some pretty long beams this time. Thankfully, I was able to borrow the free kei truck from my local DIY store to bring everything to the house.
Putting together the trusses was pretty easy, and once the first was complete it was just a matter of stacking the next one on top and copying and pasting the process. But the main problem was actually getting those long trusses safely up on to the walls and screwed in place.
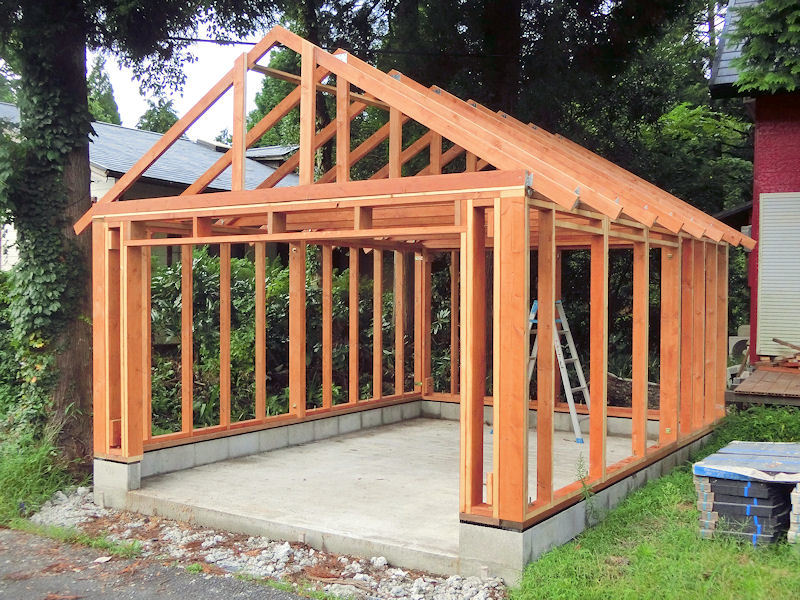
▲ そして、友達の開いている日に二人で上に載せて、「Simpson社」の台風用ブラケットで位置を固定しました。
Happily, a friend was able to give me a free hour of their time to push the trusses up and put them into place. I used cheap galvanised steel storm brackets to mark off the correct locations, and then simply slotted the trusses into each bracket before nailing and screwing them down.

▲ 次は屋根のボードですね!このOSBボードを張れば、フレームを強化できますので壁でも屋根でも利用します。内面を白く塗れば、簡単なインテリア塗装もできそうですね。ただし、今回34枚もありますので、ローラーで塗りました。
The next step was to screw down a covering of boards onto the roof trusses, to tie them all together into a rigid structure. OSB boards are designed to strengthen to structure of a building, when used for roofing and walls, and I decided to also paint one side of each board white, to act as a cheap way of decorating the interior of the garage. Since there were 34 boards in total, I used a paint roller for the first time in my life!
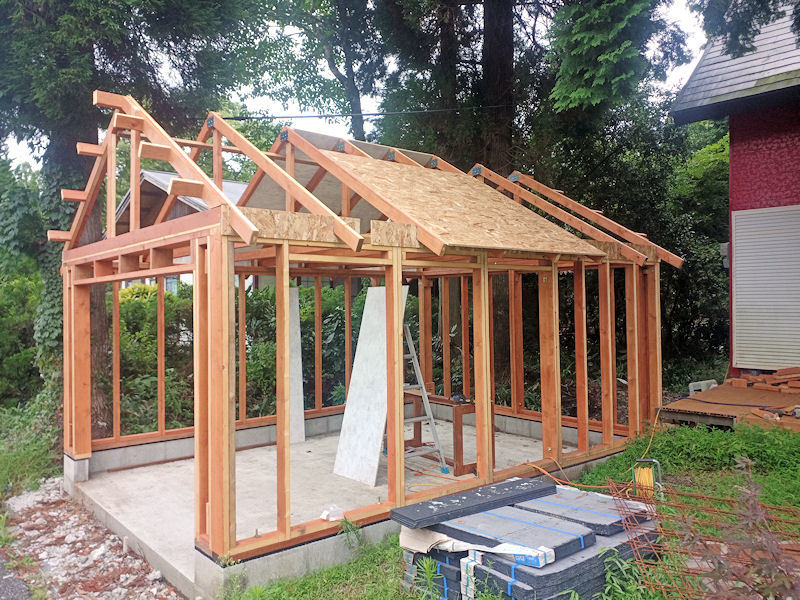
▲ まずは屋根から始めます。急に雨が降ったらカバーも置けますので、その順番がおすすめですね。屋根の三角フレームも前の日にボード幅に合わせて、設計しましたので、作業は簡単でした。
The first boards were screwed into place in the central part of the roof trusses, which had previously been placed to exactly fit the dimensions of the boards. So this was a pretty quick and simple process, and could mostly be done using a ladder from the inside of the building.

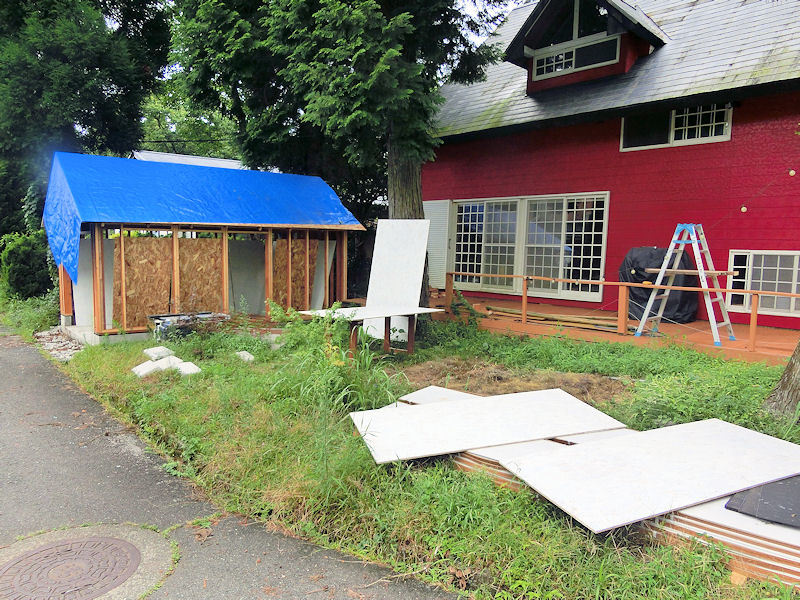
▲ 左側9枚と右側9枚で早く張れました!屋根のボード張りが終わったら、お隣さんから借りたブルーシートで一応カバーしました。
I used 18 boards in total for the roof, 9 on each side. Once they were screwed down in place, I quickly covered the roof with a big blue tarpaulin to protect it from any rain showers.
▲ 次のステップは壁でしたので、同じようにOSBボードを白く塗りました。
Then it was on to the walls! I used the same OSB boards for the walls of the garage, also painted white on one side.
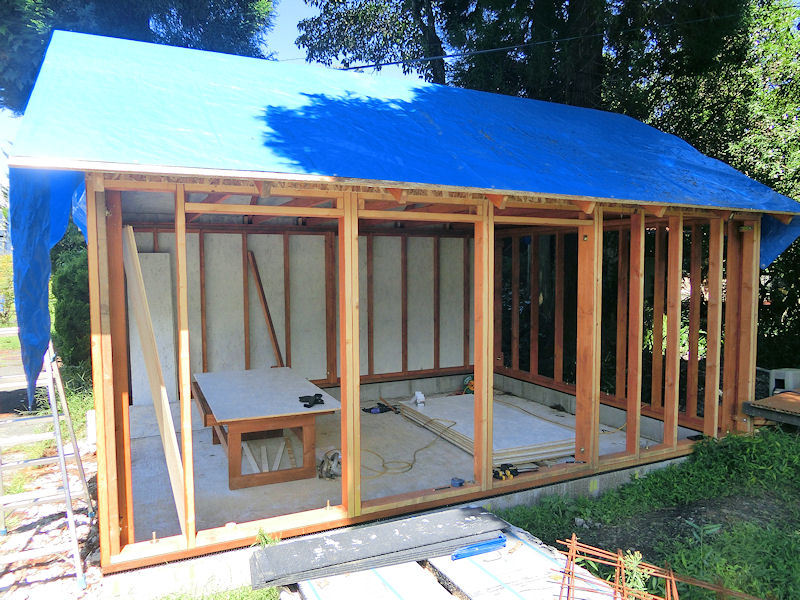
▲ 左側の壁にボードを張ったときに感動しました!すごくうれしかった!
I can't express how happy it made me to finally get the first side wall covered in boards, after such a long time planning this build!

▲ 全部の壁が終わったら本当にガレージの感じになりました!
屋根のブルーシートがちょっと小さかったので、一列の防水シートも張りました。
The remaining walls quickly followed, and it properly began to look like a garage for the first time!
I also added one strip of waterproof roof felt to the roof, because the blue sheet was just a tiny bit too small.
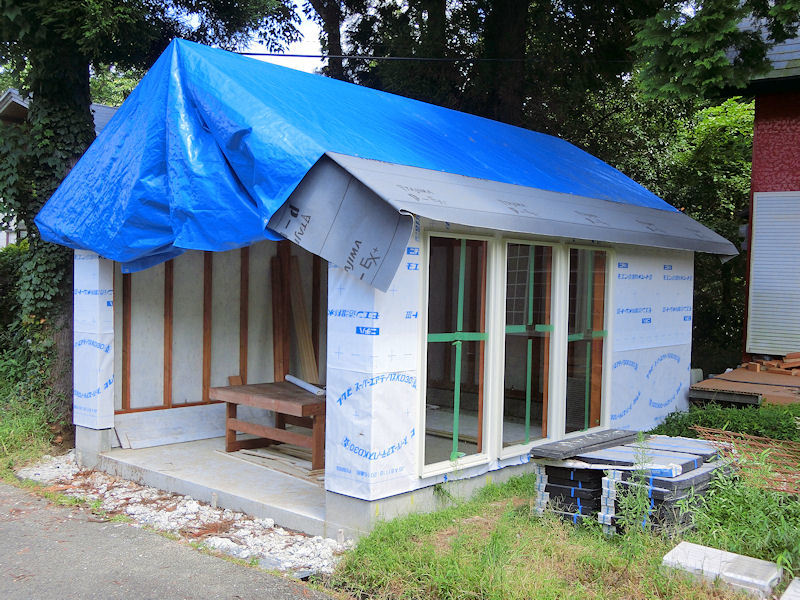
▲ ボードの上に壁用の防水シートも張りました。そして、最後に三つ大きい窓サッシも入れました!
これで一応雨から守れる建物になりました!あとちょっとですね!
Once all the boards were in place, I quickly wrapped those walls in waterproof sheeting, and slotted the 3 large windows into their wall sections. So, with the roof and walls wrapped in sheeting, the garage is now mostly rain-proof. Finally, the end is in sight!!
屋根の材料予算は18万円でした。瓦/スレートがまだ張っていないんですが、その材料の費も含んでいます。
The budget for the roof section was 180,000yen, including quite a bit of money for the roof slates which have yet to be attached.
屋根:
2x4木材: 47,183円
金具: 5,620円
OSBボード18枚: 35,640円
防水アスファルトシート18m x 2巻: 10,500円
コロニアル瓦スレート: 58,140円
屋根用鋼板など: 12,900円
合計: 169,983円
Roof:
2x4s: 47,183yen
Brackets and fittings: 5,620yen
OSB boards x 18: 35,640yen
Asphalt roofing sheet 18m x 2 rolls: 10,500yen
'Colonial' roofing slates: 58,140yen
Edging/spine strips etc: 12,900yen
Total: 169,983yen
やった!また予算よりちょっと節約できました。何か嬉しいね。
Yay! So the roofing section came in slightly under budget again, which makes me happy. Not a huge saving, obviously, but every little bit helps, right?
今週の作業はガレージのフレームです。フレームは2x4と2x6木材で作りますので、作業は早いでしょうね?
This week I've been working on the wooden frame of the garage building! The frame is made of sturdy 2x4s and 2x6s, and with plenty of pre-planning it came together pretty quickly.
▲ まずはウッドステインで塗ります。ちょうど台風が来ていた3日間は1回のスタジオで一所懸命ペイントしました。
There was an early typhoon looming large in the area for 3 days, so I spent those 3 days downstairs in a really messy studio, painting red-brown woodstain onto all the pieces of wood that would make up the frame.... and also onto the floor, and my hands and feet!
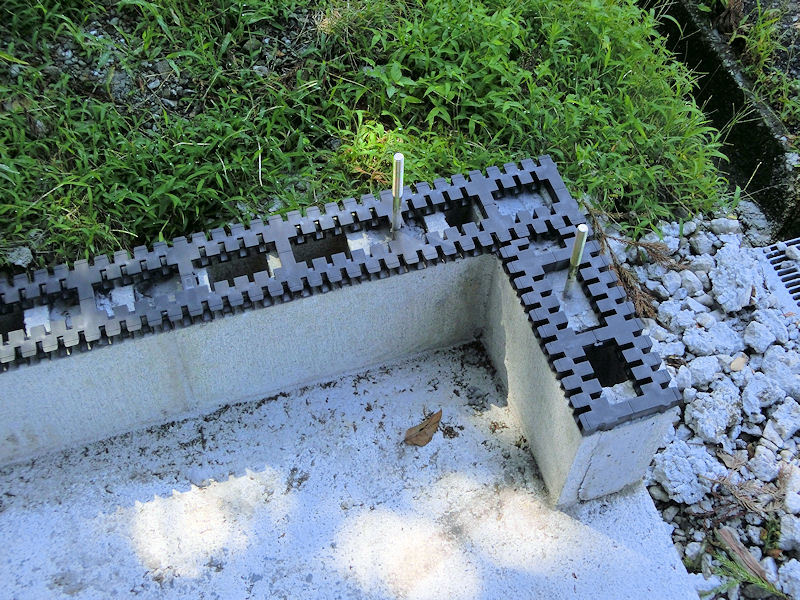
▲ ブロック壁のベースと木造フレームの間に入れる「基礎パッキン」をブロックの上に載せました。
With the typhoon safely passed and the wood all prepared, I moved outside to start the frame build. The first thing to do was place strips of these heavy-duty plastic bumpers on all the concrete base walls. They add an extra layer of water protection and ventilation to the garage, and are a pretty cheap investment.

▲ そして、ブロックのコンクリートに差し込んだボルトをフレーム位置を載せてみました。ぴったりでした!ちょっと嬉しいですね。
Drilling holes for the wall bolts to fit into the frames, I was gratified to find that everything fit very snugly, to within one or two millimetres. Yay!

▲ フレーム自体は7つの2x6箱で作っています。その箱の中に2x4材で強化しました。
The wall frames are comprised of 7 sections, so I started cutting and screwing together the first section from thick 2x6 beams. The thinner 2x4s make up the internal supports and beams, to give each section greater strength.

▲ 1個目のフレーム箱を基礎につけた時には倒さないように杉にとりあえず繋ぎました。
My friendly neighbour Teru kindly leapt out of his car as he was passing, and helped me lift the first of the sections on to the wall bolts! Just to make sure nothing fell over on my head, I screwed a spare piece of wood to the frame and the closest tree.
▲ 入口のフレーム箱を載せたときに一番下の補強もついていますが、全部つながったら切ります。
The front wall is the largest of the wall sections, and includes a long rigid beam at the bottom to ensure everything is straight. I'll be cutting out that beam once all the other sections are in place and lined up.

▲ そして、一個づつでフレーム箱を載せました。
Then it was just a process of creating each of the wall sections and lifting them into place one by one.

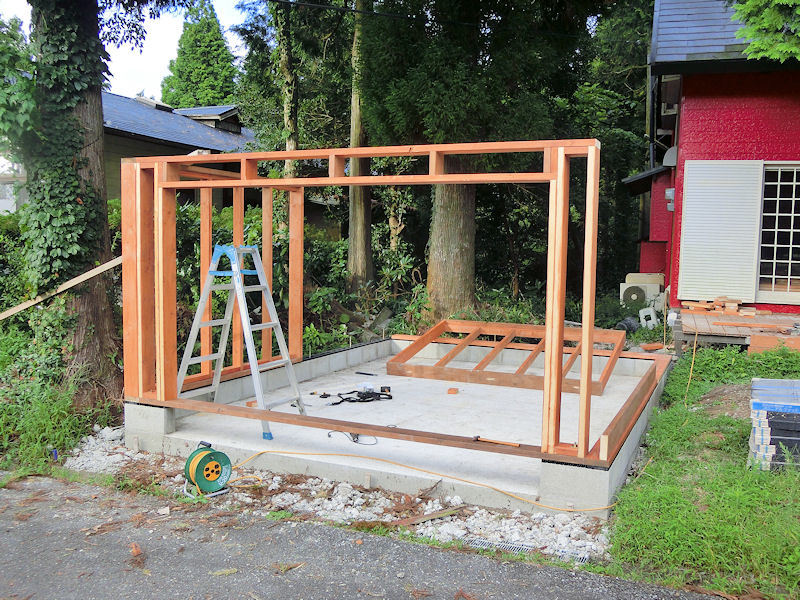
▲ 3日間後にフレーム自体が完成しました!
After three mornings of work, all seven of the wall sections were complete, and I could start tightening up the connecting bolts to make the frame rigid.

▲ 建物っぽくなったでしょう?
It's starting to look like a real building now, yes?
今回の予算は13万円でしたが、基礎の型で使った木材を再び利用できましたので、ちょっと節約できました。
2x4と2x6木材: 95,035円
ネジと金具: 6,341円
ステイン: 3,659円
合計: 105,035円
The budget for this step of the build was 130,000 yen, but I was able to save a little money by reusing some long beams from the foundation's concrete frame.
2x4s and 2x6s: 95,035yen (wow, prices are still sky high!)
screws and fixings: 6,341yen
woodstain: 3,659yen
Total: 105,035yen
先週の基礎が乾いてからペースが上がりました!今回の作業はブロック壁です。木材壁のベースとして使います。
Last week's foundation concrete has now completely dried, so it's time to move on to the next stage - making a low block wall which will act as the base for the garage. From here on, things should speed up considerably!
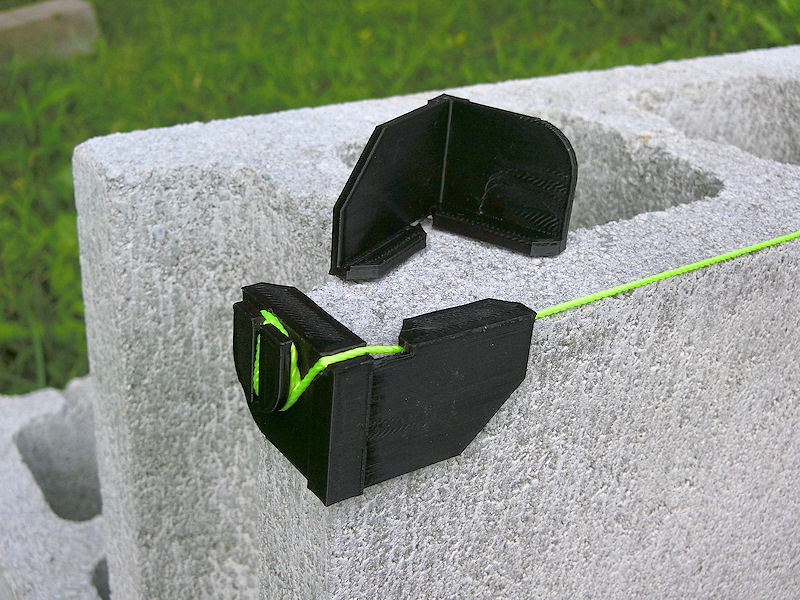
▲ まずは必要な道具の準備でした!ブロック壁を作るにはまっすぐのひも線がおすすめですが、近くのDIY店でなかなかいい道具はなかったので、パソコンでデザインして3Dプリンターで作りました。写真のような感じですね。デザインは1時間、プリントは2時間かかりましたが、やはり便利ですね。ダウンロードファイルはこちらです。
First thing to do was to assemble some basic tools; a couple of trowels, a bucket, and 33 concrete blocks. When laying a concrete block wall, it's important to be able to align the entire wall correctly, and for that you need to set the corner/ends of the wall in mortar, and use a string guide. Unfortunately I couldn't find any handy guide tools in my local DIY shop, so I quickly knocked up a pair of brackets on the 3D printer. It took an hour to design the parts, and another couple of hours to print them - but they work magnificently! A 3D-printer is such a useful machine to have available for making stuff like this!
The files are available on Thingiverse here, for anybody who wants to print them.

▲ ブロック壁用のセメントをちょっとづつ並べて、ブロックを置きました。この作業は初めてでしたが、YouTubeのビデオの通りにできました。乾いたら、写真の様になりました。入口への坂はあとで作りますので、まだ車を入れないところですね。その代わりにDIY店「ハンズマン」から木材と瓦材の配達をあそこにとりあえず置きました。
I've never done block walls before, but a couple of useful YouTube videos gave me the basics, and it turned out pretty good, I think. It tooks about 4 hours to do all the walls, setting 2 or 3 blocks at a time. The string guides were super useful!
As you can see in the photo, I still haven't added a slope for the entrance, so I'm unable to park my car there for now. Instead, I've stored some of the big sheets of wood board and rooftiles, which were delivered by a truck from my local DIY shop Handsman. The driver kindly helped me unload them, and he commented that the house has come on a treat since he delivered the wood for the deck a couple of years ago. Encouraging!

▲ 明日から台風が来そうですので、次の作業は早めにしました!鉄のピンと壁用のボルトをブロックの穴に入れて、コンクリートで固定できました。今回は約100キロのコンクリートは自分で混ぜましたが、隣の優しいTeruさんからミクサー道具を借りました。助かりました! Thank you, Teru!
We've got the first typhoon of the season coming in the next couple of days (a few weeks early this year!), so I rushed a little to finish the work on the block wall. That involved strengthening some of the joins and rebar inserts with concrete, and also setting in the big brass bolts that will anchor the walls to the base.
I bought 100 kilograms of dry concrete in bags, added water, and quickly mixed them up and poured. My lovely neighbour Teru lent me an electric hand mixer, which worked brilliantly in quickly mixing buckets of concrete 10kgs at a time.

▲ これで基礎とブロック壁が完成ですので、次は壁のフレーム作成ですね!楽しみにしています!
With that done, and everything battened down for the typhoon, the base is complete! The next job will be to create the wooden frames for the wall - which I've been looking forward to doing for ages!
予算は4万円でした。。。
ブロック33個: 7,923円
セメント60kg: 2,860円
コンクリート100kg: 4,840円
道具: 664円
ボルトなど: 5,006円
基礎パッキン911mm x 15個: 6,150円
合計: 27,443円
My budget for this wall was 40,000yen, and happily I came in under budget again!
33 concrete blocks: 7,923yen
Cement bags 60kg: 2,860yen
Concrete bags 100kg: 4,840yen
Tools: 664yen
Brass bolts, nuts, rebar etc: 5,006yen
Plastic vent brackets 911mm x 15: 6,150yen
Total 27,443yen
先週の作業でコンクリートの型を作りましたので、今週生コンクリートを入れようとします。近くにある「株式会社レミコン」の事務所に訪ねて、2立米の生コンクリートを注文しました。
Last week's job was to prepare the forms for the concrete foundations, and this week it was finally time to pour in the concrete for the garage base. I dropped in to the offices of a local concrete supplier (who were quite surprised to see me!), and organised for 2 cubic metres of wet concrete to be delivered two days later. Exciting stuff!!
▲ 生コンクリートを入れるために道具を用意しました。但し、いつものケチな私が道具を買うじゃなくて、自分で作る決まりにしました。小さい道具は約5000円でアマゾンで買えますが、簡単なデザインで考えて3Dプリンターで作りました。値段はゼロ円!
そして、大きいフロート道具は大体6~7万円でネット販売していますが、1100円の雑巾モップと木材で作りました。一回しか使わないので、結構お金の節約できましたね。
I'd put together some smoothing tools known as "concrete floats", and as always I'd opted to make these myself and save as much money as possible! The little hand tools sell for about 5000yen each, but I produced them for free by designing and printing them on the 3D printers. They aren't as durable as proper metals ones, but I'll only be using them once!
The big bull float is a handy tool for professionals, but retails at several hundred dollars, so I made my own from a plastic mop, and two bits of wood. It's not perfect, but should work okay?

▲ 午前11:00にこのミクサー車が来ました!しかし、今年最高温度の32℃の日に!
The mixer truck turned up at 11am, just as the heat of the day was reaching its height. Unfortunately, it only had a 1 metre chute, so I had to waste lots of time pushing 3 tons of concrete to the far end of the foundation area. It also turned out to be the hottest day of the year so far, which caused problems with the concrete setting pretty fast.

▲ 優しいドライバーさんがちょっと手伝いましたが、やはりこんなに暑い日は大変でした!
The driver kindly helped out at the start, shifting the concrete, and then had to leave. So I was left with 3 tons of fast-setting concrete which needed to be flattened out, using that long piece of wood to scree the top surface.
As you can see, the side near the road was soon in full sunshine, which made it set even faster :(

▲ 道揃えは早く乾燥した過ぎたのはちょっと残念でしたが、やっと使える基礎にできました!
So the edge near the road turned out a little rough, due to the faster drying time, but all the edges are nice and flat - so it should work fine to build on top of. Finally, I had a usable concrete foundation for my garage!

▲ 二日間後、木材の型を外した時にこんな感じですね!成功だ!
Two days later, I pulled off the wooden frame to find that everything seemed to have worked fine. So let's take a look at the total costs, compared to my initial budget of 90,000yen.
ここまでの基礎工事は9万円の予算でしたが、詳細は次のようでした:
材料
型の木材: 16,538yen (建物のフレームで再利用できます)
砕石 (1m³・配送込): 6,600yen
網メッシュ (10枚): 6,780yen
鉄筋 (4本): 1,352yen
メッシュ結び: 128yen
メッシュ用の載せるブロック: 450yen
生コンクリート (2m³・配送込み): 49,900yen
道具
仕上げ用の木材: 1,980yen
ゴムブーツ: (友達から借りた) 0yen
糸: 498yen
三角定規: 1,170yen
コンクリートフロート (モップと木材): 1,277yen
合計: 87,349円
知り合いから28万円のお見積りをもらいましたが、やはりDIYにしたらできることですね。
Materials
Wooden frame: 16,538yen (but I can re-use these for the building itself)
Gravel (1m³ incl. delivery): 6,600yen
Wire mesh (10 panels): 6,780yen
Rebar (x4): 1,352yen
Mesh ties: 128yen
Concrete "chairs" to lift the mesh up: 450yen
Concrete pour (2m³ incl. delivery): 49,900yen
Tools
Scree wood: 1,980yen
Rubber boots: (borrowed from friend) 0yen
String: 498yen
Triangular ruler: 1,170yen
Bull float (mop & wood): 1,277yen
Total cost: 87,349yen
知り合いから28万円のお見積りをもらいましたが、やはりDIYにしたらできることですね。
So it was under budget, and saved a whole load of money compared to having a company do it for me - one 'friend' of a friend quoted 280,000yen, which would have been half my budget for the whole garage build!
Bearing in mind that I had no experience of doing this before and no specialist tools, and learnt how to do it from YouTube videos, it's an achievable if time-consuming project for a keen DIYer!
〒869-2226 熊本県阿蘇市乙姫2070-48
営業時間:13:00~17:00*
営業日:毎週金曜日・土曜日
(* ドアが閉まっている場合もあります ー 近くにいます。ちょっとお待ち下さい!)


")
Painted models available 塗装済の模型発売中!
Making garage doors ガレージの扉DIY作成
New side-project... a hobbit house! ホビットの家
Shops added to the shop ショップにお店
Repainting a (mini) car ミニカーのリペイント
Buying land in Otohime 乙姫で土地探し
Scale model of the Inaba Residence 稲葉家下屋敷の模型
Customer request - Pokemon Ball! ポケモンボール
Garage construction ガレージ工事 PART 6
Secret Aso-volcano pool 阿蘇山の隠れプール
Garage construction ガレージ工事 PART 5
Garage construction ガレージ工事 PART 4
Garage construction ガレージ工事 PART 3
Garage construction ガレージ工事 PART 2
Garage construction ガレージ工事 PART 1
Making a capiz shell wall light カピス貝殻壁掛けライト
Making a rustic antique-style wall light アンティークなライト作成
Making a capiz shell chandelier カピス貝殻シャンデリア
Online store opening sale グランドオープンの割引
Opening a webstore 通信販売サイトを開店します!
A lucky escape with the typhoon! 台風がヤバいけどラッキー!
E-bike conversion DIYで電動自転車を作った!
$200 Underfloor heating 2万円でDIY床暖房
3D-printed OPEN/ CLOSED sign アトリエ看板作成


 神社
神社 寺
寺 茶屋
茶屋 城
城 店
店 家
家 農場
農場 建物その他
建物その他 壁・柵
壁・柵 橋
橋 池
池 LEDライト
0 コメント :
コメントを書く :