


3D-Print Studio
オフィススペースをちょっと作りたかったので、手作りで木材デスクを考えました。
Time to make myself a little office workspace! I decided to create a simple desk with a natural wood finish.

▲ まずはアマゾンから鉄の脚を買いました。「サンニードテーブル L型 脚」の2個セットは9,980円でした。
その上にDIY店ハンズマンから2枚の同じ長さの耳付き板を買いました。2枚で約9,000円でした。
載せたら。。。完成!簡単でしょう?!
To start, I ordered these two metal L-shaped leg brackets from Amazon Japan, for $100.
On top of those I screwed down two thick log planks with rough edges, purchased from my local Handsman DIY store for about $90. After some sanding.... that was it! All done.
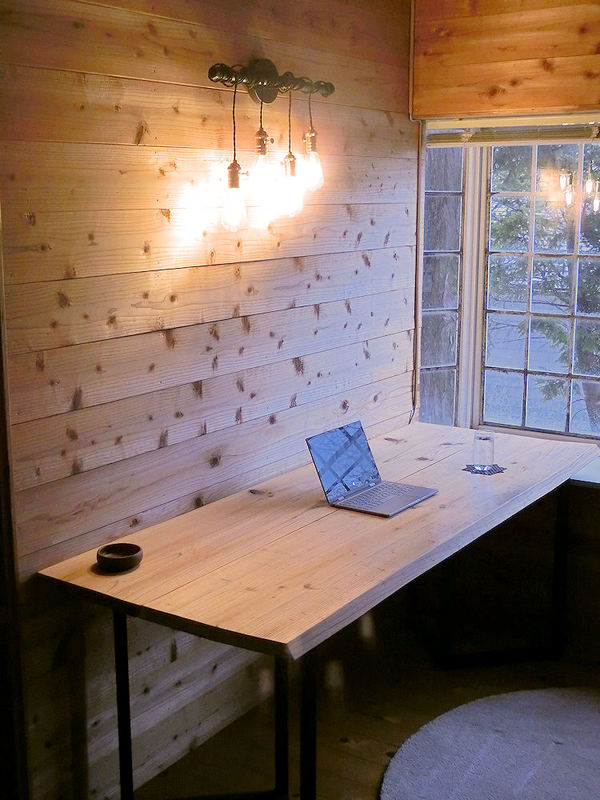
▲ デスクの木材を守るために「アンティークワックス」を使いました。色は確かに素敵!
壁のライトは海外のEbayから7,240円で買った。「Industrial Vintage Retro Wall Light Bar」で探せば、見つけれると思います。ライトはE26用またはE27用のサイズだったら簡単に使えます。110V電球が必要ですのでそのエジソン風のLED電球はアマゾンJPから買いました。
I wiped a product called Antique Wax (from my local DIY store) across the top and sides of the desk, to protect the wood and also bring out the warmth of the woodgrain.
The industrial retro light on the wall was ordered on Ebay for $72, and the Edison-style LED lightbulbs were ordered from Amazon Japan, so that the voltage would match Japan's 110V system. 
▲ 可愛いでしょう?小さいラグ(イケア製)とバランスチェアで仕事べできました!
Add in a little kneeling chair and a rug, and my office was finished! Katie the dog will happily curl up behind me on the rug while I'm tapping away on the computer. It's quite a cosy little space, especially in the mornings with the sun shining in, and a lovely view of the volcano nearby.
2階と1階をつなぐ階段にはドアがありません。このままだと冷房しても暖房してもあまり意味がないですね。ただし、普通のドアを付ける場所はないのでスライド式ドアをDIYで作りましょう。。。
The stairs connecting the first and second floors of the house don't have a door at either end, so heating the living room in winter or cooling it in summer is currently pretty much impossible. Since I can't really add a normal hinged door there, I decided to make my own sliding barn door.

▲ これは2階のリビングの部屋です。写真の真ん中にある柱の右側に手すりがありますのでそこはアクリル板を張ります。ネットでアクリル板屋さんから注文しました。手すりの上に1枚と手すりの下にまた1枚を図って、ネット店にカットもお願いしました。
This is the stairwell in the corner of the 2nd floor living room. The space to the right of that upright column has a nice wooden handrail, so I ordered some 3mm acrylic sheet to fit above and below it.

▲ アマゾンでスライド式ドアキットを注文しました。キット内容は180cm(6フィート)のレール、ドアに付けるローラー2個とネジ部品などでした。7,590円で買いました。
For the door I ordered this black iron sliding door kit on Amazon Japan for $75, which contains a 6ft/180cm rail and 2 rollers which would affix to the door.

▲ まずはDIY店から5mmのMDF板と1x4パイン板を買いました。ドアの正面の裏面にもパインを張りますので、その間にMDF板を入れます。ドアに窓も付けますので、窓の形をMDFから切って4mm厚みのアクリル板をあそこに挟まった。木材ボンドは両面にも使ったんですが、ネジは裏面だけに使いました。
To fit this rather tall space I needed to construct my own door, so I started with a sheet of 5mm MDF board cut to the dimensions of the door. I also wanted to include a large window to keep the stairwell as light as possible, so the space for a 4mm acrylic sheet was then cut out of the MDF. I then used wood glue and the occasional screw to attach 1x4 pine planks to each side of the door.

▲ 正面にキットのローラー2個を付けるとテストで載せました。成功だ!やった!
ドアに下のほうに斜めのパイン板を入れました。ちょうどいい長さに切るのがちょっと大変だったけど、雰囲気が好きだった。あとは色ステインしました。
これで使えるようになったんだけどその窓はイマイチでした。ということで数週間後に偽ステンドグラスを作ってみました。
After attaching the 2 rollers to the top of the door, I was able to check it fitted and rolled properly.
Then I added more pine planking to the lower half of the door, in a herringbone pattern, and darkened the wood with woodstain.
At this point I had a fully functioning door, but I wanted to brighten up the window area.

▲ その前にアンティーク屋さんでステンドグラスを探してみたんですが、なかなかサイズとデザインが合わないんですね。
その代わりに3Dプリンターでオリジナルデザインで作りました。サイズ的に30cmずつでプリントしましたが、接着剤でつなぎました。
I'd previously looked in local antique shops for suitable stained glass, but hadn't found any the right size or in a design I liked.
So instead I turned to my trusty 3D printer, and drew up this custom design to fit the window. The size of each printed piece was limited to 30cm by the size of the printer itself, but it's easy enough to glue the pieces together to make a bigger design.

▲ 正面の偽ステンドグラスのデザインはこんな感じでした。プラスチック製ですので、重さが300gほどかなぁ?
両面テープでドアの窓に張りました。
One big advantage that a 3D-printed design has over a real stained glass window is the weight. This probably only weighs maybe 300g, so I stuck it to the window with double sided tape. It cost only about $5 to print.

▲ 張った後に裏面を塗りました。TAMIYAのクリアペイントの赤と緑(各500円)で2回塗りました。最後にダイヤモンド形の部分には半透明のクリアファイルを切って、両面テープでつけました。
After attaching it to the window, I used a couple of pots of Tamiya Clear Paint (red and green) to paint the back of the window a couple of times. For the smoky white diamond shapes, I just used some spare plastic sheets I found in the local 100yen shop, carefully cut to size and taped on.

▲ ハンドルはDIY店のHANDSMANで買いました。裏面にはふすま用の埋め込みタイプのハンドルが必要でした。
The wrought-iron door handle was found in a local DIY shop, and matched the look pretty nicely.

▲ どうでしょうか?ウッドの部屋にはちょっとだけのカラーがいいと思います。
So here's the finished door! In a room predominantly decorated in basic wood colours, I think it definitely helps to have a splash of bright colours too.
やっと、最後の洗面台までできました!2階のトイレにも80年代のちょっと匂い洗面台ですね。捨てよう!
I'm finally on the last of the 3 sink cabinets - this one is the toilet cabinet for the second floor, which is the main one I'll be using every morning for shaving, brushing teeth etc. So I made it a bit special!

▲ 引っ越した時の状態です。
今回も、またイケアの「TORNVIKEN」(13,000円)シンクを使います。作成し方は1回目の洗面台と同じですが、こっちにはお湯の水管もありますので、またアマゾンで買った「Kindness 洗面用水栓」(4,099円)は利用できます。
This is how the toilet looked when I bought the house. Old and slightly musty. So I threw out the old sink unit, and replaced it with another DIY cabinet and walnut counter cut from Ikea. On top of that went the larger Ikea sink ($130) and the same white/chrome mixer tap ($40) as I'd used on the other sinks.

▲ ここでひげ剃りをする洗面台ですので、鏡の上に明るいライトを付けます。LEDライトはアマゾンで買ったメーカー「KTOL」(5,882円)でした。
Since I'd be shaving here (and makeup etc for guests) it needed bright task lighting. I found this simple and modern LED bar light for $60 on Amazon Japan.

▲ モダンな見やすいスイッチとコンセントを洗面台の横に付けました。これもアマゾンで1,021円でした。
I relocated the power socket to above and to the side of the counter, and added in a big modern button for the LED light.

▲ そして、最後にちょっとだけの棚を付けた。たった10センチほどの「LAPTAIN」(1,390円)フローティング棚3個セットをアマゾンで買いました。
Finally, I found this triple set of tiny 10cm white floating shelves on Amazon for $13. I've found that limiting the available shelf space really keeps it tidy and free of clutter!

▲ ホワイトとウォールナットのキャビネットが木材の壁とよくマッチしていますね。大満足です!
Putting it all together created this very stylish and modern sink area, which matched the clean white perfectly (I think) with the existing wooden walls. Yay!
2個目の洗面台はお風呂部屋の横にあります。35年前の洗面台ですので、古くて匂いもちょっとありますね。
The second washbasin I wanted to change was the one outside the bathroom, which was yellowed with age and smelled pretty much like it was a 35-year old sink unit.

▲ 古い洗面台は相変わらず鉄でできています。リサイクルセンターで捨てました!
This was the old cheap metal cabinet unit with a ceramic sink, and I got rid of it at the local recycling centre for a few hundred yen.
▲ 今回はもうちょっと大きいシンクが欲しいですのでイケアの「TORNVIKEN」(13,000円)を使いました。作成し方は1回目の洗面台と同じですが、こっちにはお湯の水管もありますので、またアマゾンで買った「Kindness 洗面用水栓」(4,099円)は利用できます。
イケアの259cmのカウンターの3分の1、アイリスオーヤマの化粧板とイケアの扉ヒンジを使いました。
Construction was similar to the previous toilet washbasin, except that I used a larger sink from Ikea ($130), and also the tap ($40) had an additional hot water connection. Pipes were included anyway with the tap fixture, so no extra cost there.
For the rest I used another third of the long 259cm counter from Ikea, white veneer boards from my local DIY store, and Ikea push-close hinges.

▲ 合計36,000円ほどでできています。その上にイケアの50cm「LANGESUND」鏡(3,999円)を付けた。シンプルでおしゃれ!
In total I think it came to about $360, which is getting a little expensive, but makes SUCH a great improvement to the room. Stylishly modern and simple.
2階の上にちょっとロフトスペースあります。
This house has a loft above the 2nd floor. It's not huge (it's a mezzanine), but it's big enough for guests to sleep there.
▲ 前の方が手作り梯子を使っていたらしいだが、収納はできなかった。ロフトの柱にひもでつながっていますので、あまり好きじゃないですね。但し、梯子がないと不便。DIYで収納できる梯子を作りましょう。。。
The previous owner had tied a rickety ladder there for access, which looked to be homemade. But the problem was that it looks terrible when you don't need to use it, as it's right in the middle of the living room.
▲ ツーバイフォーの大きい4mバージョンを2本買いました。その間に14cmのパイン板を入れました。よく図ってからステップのところに1cmほどの深さにルーターで板用のチャンネルを作りました。木材ボンドとネジで固定しました。
I came up with this simple design for a replacement ladder, which is much sturdier. Using two 4m-long 2x4s, I used a router to cut slots 1cm deep where each step would be located. Gluing each one into place, these were also screwed in tightly.

▲ 今のとおりだと前の梯子とあまり変わらないでしょう?確かに強くなったですが、同時に重くなりました。ということはロフト床の端っこに小さいホイールを付けました。そして、梯子の一番上の裏側にもホイールを付けました。これで使っていない時に梯子を上に上がって、ロフト床ににスライドできます。
But that as it is, wouldn't be much of an improvement over the previous version, right? So I added small 5cm wheels to the edge of the loft floor, so the ladder beams could slide along it. I also placed small wheels on the underside of the ladder at the top, so it will roll across the loft floor.
So by lifting the ladder up, it can be easily slid up and back, across the loft floor. That way it stays out of the way when not in use.

▲ ロフトは結構低いんですが、一応使えるスペースですね。二人用のキャンプベッドを入れました。その窓から阿蘇さん見えますよ!
Here's the loft space. Not huge, but perfectly fine for 2 camp beds. The view from the small window looks straight up to the volcano!
〒869-2226 熊本県阿蘇市乙姫2070-48
Aso City, Otohime 2070-48
Open from 13:00~17:00*
Fridays & Saturdays
(* if the door's closed, we might have popped out to walk the dog... back soon!)


")
Painted models available 塗装済の模型発売中!
Making garage doors ガレージの扉DIY作成
New side-project... a hobbit house! ホビットの家
Shops added to the shop ショップにお店
Repainting a (mini) car ミニカーのリペイント
Buying land in Otohime 乙姫で土地探し
Scale model of the Inaba Residence 稲葉家下屋敷の模型


 Shrine
 Temple
 Teahouse
 Castle
 Shops
Shops Houses
 Farm
Farm Other Buildings
 Walls & Fences
 Bridges
 Ponds
Ponds LED Lights
0 Comments :
Write a comment :