


3D-Print Studio
やっとバスルームの作成が終わりました! 完成の写真を見せましょうか。。。
My $2000 DIY bathroom project is finally finished, and came in pretty much on budget! Let's take a look...

▲ イギリスから来たバスタブとユニークな蛇口はよく合いますね!棚に何を置こうかなぁ。。。
小さいステップの周りに黒い小石をアクセントで入れました。
I think it really was worth getting this bathtub shipped from the UK via Ebay, as it completely transforms the bathroom into something special. The curved wooden back wall and ultra-modern waterfall taps looks fabulous together!
The little step up to the bathtub isn't strictly necessary, but it looks good surrounded by the black pebbles at the edge of the floor.

▲ 反対側のシャワーも素敵!壁と天井の木材部分がアピールポイントです。
Opposite the bathtub we have this unique shower area, with a mirrored version of the curved wooden wall extending up onto the ceiling.
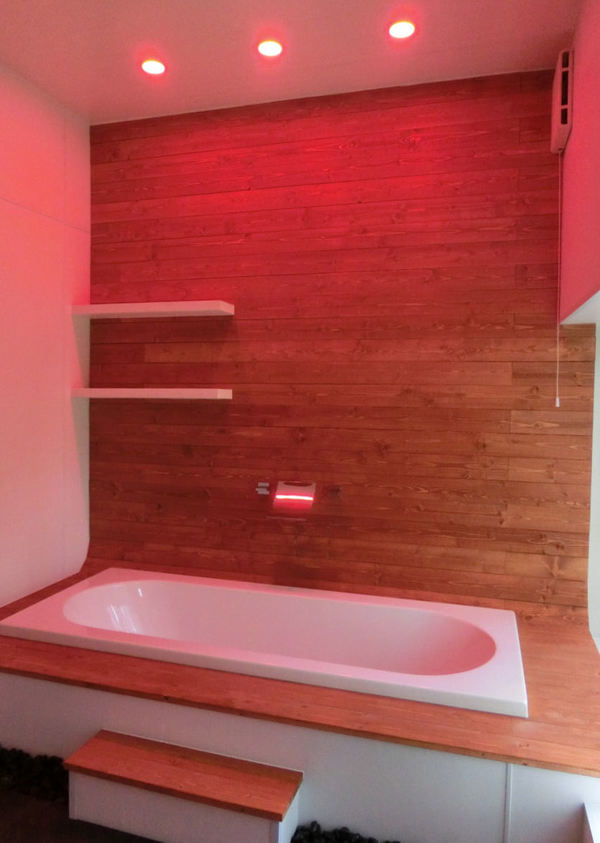
▲ そして、LEDの照明をムードライトにも使えます!
暖かいRED.....
You can have some fun with the lighting controls, which look especially good in a hot steamy bathroom!
Here's a pic of the bathroom in energising red...
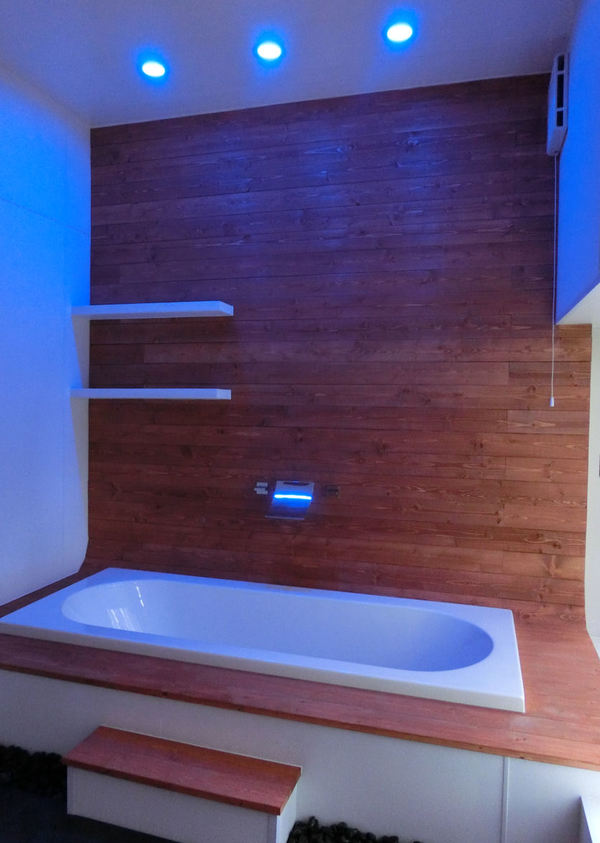
▲ ....さわやかな BLUE...
... cool blue.... 
▲ フレッシュなGREENも!
... and finally fresh green!
I love it!!!!!
お風呂作ろうね!新しいバスタブを入れる作業とパイプの接続作業に進みます。
We're closing in on completing the bathroom now - just a few more jobs to take care of...

▲ お風呂の蛇口は壁に付けます。ただし、日本メーカーの面白くない蛇口は使いません!それはちょっと持ったないですので、今回アマゾンジャパンから買った「waterfall tap」を使います!メーカーは中国のJiaYouJiaですが11,500円の価格がすごいです!
Standard bath taps in Japan suck. They are functional, perhaps, but also very, very ugly. They are also overpriced, with a basic double mixer bathtap costing around $250. I wanted something a little more interesting, and was happy to find this beautiful waterfall tap (from China) on, of all places, Amazon Japan! Even better, it only cost $115, which I think was a real bargain!

▲ ドレインはプッシュボタン式のONECE(1,599円)もアマゾンから注文しました。DIY店で買える塩ビパイプとつなぐことができます。
My new bathtub has a central drain hole in the floor, but I needed to buy my own drain for it. I found this one in bright chrome, to match the taps, for only $16 from Amazon Japan.

▲バスタブの側面にはオバーフロー穴もありますので、このドレインもアマゾンから買いました。3,080円でした。
Similarly, I found this overflow drain for the side of the bathtub for $30 from Amazon.

▲ 私はお風呂よりもシャワーのほうが好きですので、海外のEbay.comからユニークなシャワーを注文しました。「Rainfall shower」を検索したら、結構出ます。色々なタイプありますが、買ったシャワーが12インチ(30cm)の約14,000円でした。
Personally, I prefer showers to baths, so I was happy spending a little more on a kickass shower head. As for choosing bath fittings, Japanese ones from makers like TOTO and INAX are functional but ugly, and vastly overpriced. This kind of rainfall shower fitting is unheard of here in Japan, so I bought this 12" set from Ebay for about $140 (shipping included).

▲ 壁の中のパイプ接続が本当に嫌ですね。古いシャワーにはもちろん鉄の管が利用されましたが、最近曲がれるプラスチックパイプもDIY店から購入できる時代に変わりました。価格がちょっと上がりますが、使い方がとても簡単ですね。ということは古い鉄のパイプを曲がるパイプに接続できました。
写真はシャワーの初テストでした!やった!
The pipe connections were, I'll admit, a pain in the butt. The old pipe connections were, of course, metal, and that made it far too difficult to make the complicated pipe runs inside the walls. I was happy to find that technology has moved on a little since the 1980s, and I managed to connected the previous metal pipes to insulated plastic flexi pipes without much trouble. Of course it does cost a little more to get the pipe connectors for flexipipes, but it's a fair trade off, I think, in terms of ease-of-fitting!
The photo shows the first test of the new shower, after the pipes have been connected. Finally!!!!

▲ そして、壁に防水用のシートを張りました。ユニットバスにはバス専用の180cm x 90cmほど「バスパネル」が使われていますが、値段は何と1枚1万円です!それもちょっと予算オーバーですので、プラスチック段ボールの材料「プラダン」を使います。防水性が同じですので、1枚約500円だけですので結構節約できます。プラダン板の間にシリコンコーキングを入れました。
白い壁だけならちょっと普通っぽいて感じですので、木材のアクセントも使います。シャワーの壁には幅60センチの木材壁を張ります。DIY店で安い18mm厚みのパイン (1x4s) を買って、防水ステインを塗りました。強い両面テープで張って、やっとシャワースペースが完成となりました。
木材の壁を80センチほど天井にも張りました。バスタブ側にも同じパターンを使うつもりです。
It was time to start fitting the walls! The standard approach for modern Japanese bathrooms is to buy a "unit-bath", which includes all walls, floors, ceilings, bathtubs and fittings. You can buy the wall panels separately, if you look online, but as many things considered too complicated for the average user here, they are expensive. So rather than spend $100 for each 180x90cm panel, I looked around for alternative materials and found corrugated plastic sheets for only $5. These are usually used for a plastic version of cardboard boxes, but since they are still 100% plastic they will be waterproof. I sealed the gaps and corner joins with silicon caulking.
Now that I had some lovely white walls, I wanted to brighten things up with some more colour, so I decided to create a wooden shower "wall". I bought lots of cheap pine 1x4s from my local DIY store, and cut them to 60cm lengths and painted them with waterproof woodstain. Then it was a simple process of sticking each one on with strong (waterproof) double sided tape, and sealing the ends to the wall with silicon caulking.
I continued the wooden strips up on to the ceiling, to create a visual "roof" to the shower unit. This same curved shape will be mirrored on the far wall, around the bathtub.

▲ では、バスタブの作業に戻ります。まずは木材フレームを作って5センチを上に上がりました。その5センチの間には蛇口用のパイプを通しました。古い鉄管がバスタブの右側に見えますが、コンクリートの中に囲まれていますので、移動できなかったです。そのためにできるだけ隠すようにしました。
Over on the bathtub wall, I made a wooden frame to lift the bathtub up slightly. The old waterpipes are encased in concrete at one end of the bath, and I couldn't move them. So instead, I created just enough room to hide the pipe tops under the new false bathtub surround, and connected them using more plastic flexipipes. These were then threaded under the corner of the bathtub, and up into the false wall at the back, where they'd connect to the new taps.

▲ バスタブの周りにコンパネ板を載せて、パイン板張りの作業が始まりました。
I encased the bath frame in painted plywood, and then started on the process of gluing more planks of waterproofed wood on top.

▲ こっち側にも防水性が必要ですので、板の間に透明のシリコンコーキングがキレイに塗っています。新しい蛇口を接続するとテストできました。成功だ!
The gaps between planks were carefully filled with clear silicon caulking, to make this area as waterproof as possible. The planks were roughly curved up the wall, and finally I was able to fit the new bath taps in place and test it!

▲ 古いバスルームの床もタイルでした。ですが全体のリフォームですので、床も作り直します。このタイルはDIY店ハンズマンから買いました。ドレインの周りに切るのがちょっと大変だったけどやっと終わりました。
One last job was to lay a new tile floor. The previous floor was small white tiles, but some were chipped and cracked from the earthquake, so I bought these dark grey tiles from Handsman DIY store for about $200, and stuck them straight on top, so the water will run down into the corner drainhole.
▲ もうそろそろ完成となりますが、プレビューを見せましょうか?隣の洗面台から見ろとこんな感じです!
The bathroom is almost complete, so here's a sneak peek taken from the adjoining washroom area. Completed photos coming next....
バスルームの新しい天井パネルとライトの作業が始まりました。天井にはフクビの「バスパネルEX」(2mx30cmで約1600円)を使いました。バスパネルには1センチほどの断熱材が入っていますが、その上にグラスウールの断熱材もいっぱい入れました。
Time to start rebuilding the bathroom! First thing to go in was a replacement ceiling, which was bought from a local building supply shop. These were the same dimensions as the previous ceiling, and come in 2m x 30cm panels for about $16 each. They have about 1cm of heat insulation material on the back (so I added lots more insulation above the ceiling!), but are super light and can be just tacked up to the existing wood frame.

▲ バスタブの上にダウンライトを付けたいです。ただし、湿度が高いバスルームには防水ライトが必要でしょうね。アマゾンで見つかったライトはこの「Mi.Light」LEDダウンライト(2,179円)でした。浴室でも使えます。
普通のライトではないですよ。。。。
I wanted to put in 3 downlight LEDs above the bathtub, but of course these need to be waterproof units. I found these excellent Mi.Light LEDs for $21 on Amazon Japan, but they are not just any old lights......

▲ 同じメーカーのワイヤーレスコントローラ(2,699円)を利用したら同時にライト何個もつなぐこともできます。そして、明るさと色も設定できます。この価格でこんな機能が素晴らしいと思います!
.... if you connect them wirelessly with this great value control unit ($27), you can then change the room lighting to any of 256 colours! You can also play with the brightness and saturation levels too. With 3 lights and a controller costing under $100 for such amazing functionality, these are such great value!! I can't recommend them enough.
▲ お風呂の上に3個のLEDダウンライトをつました。ナイフで穴を開けて、電気配線をつなぐだけです。すごく簡単でした!
Fitting the lights is easy. I cut three holes with a knife, connected each wire to a power cable, and pushed the lights into the holes. After a few minutes of fiddling, the controller beeped to tell me they'd all wirelessly connected properly, and I got to play with the colour wheel. Too much fun!!

▲ 2階のキッチンへの下水パイプが8センチほど1階のバスルームに出ていますので、新しい壁を10センチほど移動しました。古い壁とと新しい壁の間にまたグラスウール断熱材いっぱい入れました。
その上にコンパネ板をはりました。
So on with the renovations! A waste-water pipe from upstairs protruded about 8cm into this room (it had previously been inside that false wall space in the corner), so I took this opportunity to move the left-hand wall 10cm further into this room. This neatly covered the pipe and let me stuff in lots more glass-fibre insulation. On top of that I screwed on some plywood panels that have a high gloss paint on one side - I hoped this would add some water-resistance until the bathroom was complete.

▲ 右側の窓の周りにもできるだけ断熱材を入れて、コンパネ板をはりました。
I did the same with the window surround, rebuilding it with insulation rolls and plywood panels.
▲ 最後に、後ろの壁も8センチほど移動しました。古い壁と新しい壁の間に断熱材を入れました。
水道栓が壁に付けるつもりですので、パイプを通れるスペースを空けました。
The back wall was also brought about 8cm further into the bathroom, which gave me enough space to run water pipes inside it to a wall tap unit for the bath. And of course to stuff in lots more glass fibre insulation!

▲ これで壁の準備が大体できていますが、残っている作業がバスタブの穴ですね。これは大変だったよ!!
新しいバスタブが古いやつより長いですので、厚み15センチほどのコンクリートを外さないといけないね。ただし、ハンマー、丸鋸やバールで頑張っても壊せんかった。どうしよう?!。。。で、やっとできる方法考えた。3トンのカージャッキで下のほうからやっと壊せました!
With the walls mostly insulated and roughly covered for now, I turned to the last big problem for this project... the bathtub! The old bathtub was about 110cm in length, and since I wanted a longer tub I needed to remove this 15cm thick slab of concrete to make space. This was a pain in the butt! I tried hammers, chisels, crowbars and circular saws, but nothing was able to shift it. Then I had a brainwave, and look how happy I was to see it worked - I placed a 3ton car jack underneath the slab, and lifted it slowly up. At long last it cracked apart, and I could relax a little!

▲ タイミングがちょうどよかったですね!
同じ週にイギリスのほうから新しいバスタブの配達が来ました。日本で買うと10万円ほどかかるけど、海外のEbay.comサイトでこのバスタブを注文できました。バスタブが約2万円で送料も2万円かかりました。配達が約1か月かかりましたので、すごいドキドキしていました。
写真は玄関で箱を開いたときの満足度100%ですね!
The same week that I was cracking that concrete apart, a delivery arrived from the UK. Long bathtubs (known as "European-style" here) are very expensive in Japan, because you don't normally find them in the standard "unit-bath" kits. So instead of paying over $1000 to buy from a Japanese retailer, I managed to find this acrylic bathtub on Ebay, which cost about $200. Shipping was another $200, and it took about one month to arrive.
The photo is just a pic of me, feeling particularly smug (sorry!) after unboxing it in the entrance hall!
家のリフォームならいろいろありますが、これがメインですね!DIYでバスルームを作ります!
ユニットバスなら100万円ほどかかりますが、今回の予算はなんと20万円だけです!
At last we come to the biggest job of the house renovation... the bathroom! Japanese bathrooms are usually downstairs, because they are designed to be watertight, with a central drain in the floor letting you shower and splash without worrying too much. This one, unfortunately, needs to be ripped out and replaced from scratch!
I could choose to go the more normal route of getting a regular bathroom "kit", with plastic walls, floors and ceilings, but that would cost anywhere upwards of $10,000. But it probably wouldn't fit brilliantly anyway (because this house is oddly shaped, with a large window) so instead, I'm going to try building my own from scratch, to a budget of about $2000. I love a good challenge!

▲ 2016年の熊本地震でこのバスルームがダメになりました!壁は厚いコンクリートとタイルなのに、地震でタイル落としたり、ひびが出たりしました。
Here's why the whole room needs to be rebuilt - the big 2016 Kumamoto earthquake, the one that collapsed the famous Kumamoto castle, also did irreparable damage to this bathroom.

▲ このままだと使えない部屋になりました。
ということは全部ごみにして、ゼロから作り直そう!
The thick concrete walls and floor all cracked, and tiles started to shake off the walls and floor. This meant that the bathroom was no longer watertight, so it will all need to be redone from nothing!

▲ まずはこの邪魔な壁から壊す。向こうの部屋には収納スペースがありますので、こっち側のバスルームが若干小さくなりました。これはダメですね。コンクリートとタイルを外すとこんな感じでした。
First job was to knock down this redundant wall. The room on the other side has some shelf space built into the wall, which has pushed this section of the wall about 40cm further into this bathoom. Which is, quite frankly, a stupid design!
So I started this big job by slowly cracking apart the concrete and tiles, to remove the wall. Felt goooood!

▲ 壁を全部壊したら向こうの部屋から穴がありました。その部屋の収納スペースは使う予定はないので、向こうから壁を作り直す。
Of course removing this wall meant that there was a bloody great big hole coming in from the next room!

▲ 向こうから壁を作るとこんな感じでした。バスルームの壁位置がちょっと変わりましたので、新しい天井も必要となりました。
I patched up the wall in the other room from that side, which left me with a roughly square-shaped bathroom once again. With the bigger bathroom, I also needed to pull out the old ceiling panels and replace them with new ones cut to the new room dimensions.

▲ 数日後、左側の壁と後ろの壁を全部外しました。大体500キロのタイルとコンクリートを外に投げました!
やっと古い風呂タブも外せました。阿蘇市の未来館リサイクルセンターで何百円で捨てました。
これで部屋をゼロに戻しました。これからの作業は全部作成だけです!
After a few more days of work, I had managed to remove about half a ton of thick concrete and tiles from the left-hand side and back wall of the bathroom. The small bathtub was slowly levered out of the concrete hole and taken to the nearby recycling dump.
With that, the old bathroom had been mostly knocked down, so everything after this point would be rebuilding! Yay!
乙姫ペンション村には面白い建物を見つけたよ!ゾンビ映画に出そうな廃墟です。
ケイティちゃん(犬)の散歩のときに見つけましたが、場所分からないとみんなさん見えないと思います。地図貼るね。。。
On one of our walks in the local area, Katie (the dog) and I came across this very interesting ruined building in a quiet wooded corner of Otohime Pension Village, and I couldn't resist a little bit of urban exploring.
▲ 地図には書いていないですが、衛星写真に出ます。
It's no longer marked on maps, but you can still see it on Google's satellite photo.

▲ 外からとこんな感じですね。庭には草がいっぱいありますが、通れます。
この建物の歴史がわからないんですが、結構有名なホテルだと思う。温泉とイベントホールなどもありますから昔は大きかったでしょう?
The entranceway is rather overgrown with weeds these days, but you can see that it was once a fairly grand hotel. I'm not certain of the period, but I'd guess from the age of some of the electrical items still in there, that it was abandoned in the late 90s or so? It has an onsen hotspring in the basement, and a large event room and lobby, so it was probably well known back then.

▲ 入口が開いていますので、この写真は受け付けですね。古いパソコンもそのまま置いてありますので2000年ほどかなぁ?
The front doors are ajar, so you can wander in and see the derelict reception desk in the photo. They still have some old tourist pamphlets and an old computer behind the desk, which gave me the rough idea as to the date of abandonment.

▲ ロビーです。あっちのダイニングホールにはまだ食器もあります。
To the left of the reception desk you've got this wide lobby, with a dining area beyond. All the dishes are still strewn about the place, and the kitchen seems to be the only place stripped of items. There was a bat flapping around the lobby ceiling somewhere.

▲ ロビー内のソファです。阿蘇の湿度で壁紙や天井がだんだん落ちてきますね。
The lobby still has plenty of armchairs and sofas thrown around the place, but you can see how the humid atmosphere of Aso in summer has really done a number on the wallpaper, carpets and ceilings. It's literally peeling off! This would be an ideal setting for a little zombie pic, I think!

▲ 2階の部屋には畳、ブラウン管のテレビ、家具や布団などがまだありますが、自然が戻ってきていますね。
Upstairs on the 2nd floor were all the guest rooms, some of which are still reasonably untouched by the elements. You can still see slippers, futons and even overturned TVs in most rooms, but the one in the photo above is probably the most striking - you can see plants growing up from rotten tatami mats, where the rain has started to get in.
Truly, an interesting place. Makes you think...
〒869-2226 熊本県阿蘇市乙姫2070-48
Aso City, Otohime 2070-48
Open from 13:00~17:00*
Fridays & Saturdays
(* if the door's closed, we might have popped out to walk the dog... back soon!)


")
Painted models available 塗装済の模型発売中!
Making garage doors ガレージの扉DIY作成
New side-project... a hobbit house! ホビットの家
Shops added to the shop ショップにお店
Repainting a (mini) car ミニカーのリペイント
Buying land in Otohime 乙姫で土地探し
Scale model of the Inaba Residence 稲葉家下屋敷の模型


 Shrine
 Temple
 Teahouse
 Castle
 Shops
Shops Houses
 Farm
Farm Other Buildings
 Walls & Fences
 Bridges
 Ponds
Ponds LED Lights
0 Comments :
Write a comment :