


3D-Print Studio
去年、フェイスブックで友達に聞いてみた ー 家を何色にペイントしたらいいの?
家の写真をペイントソフトで変更してみましたので、大体のイメージが作れました。。。
Last year I asked lots of friends what colour I should choose for a whole house repaint, and to help with envisioning all the different colours, I knocked up a few quick paintshop previews....


▲ その時にデッキの色も決まっていなかったので、各色には黒のデッキとブラウン色のデッキバージョンを作った。友達の中で seagreen、red と whiteは人気だったが、結局赤に決めました。明るくて、暖かい感じにしたいですね。
At that time I hadn't yet decided on whether to go with brown or black for the decking, so I produced those two versions for each of the 9 colours I liked best. The most popular colours seemed to be red, seagreen and white. Of course the house is currently white, so that was out, and the seagreen seemed to get lost a little in so much woodland, so in the end I decided to go with a red - vibrant and warm. The actual paint I ordered was a slightly darker red than primary red, after some further playing around in paintshop.

▲ 今月やっとペイントを始めました!大変な作業を応援するために一番大事な正面から始まった。これから足場なども作らないといけないんですが、いかがでしょうか?
This month I finally got the chance to try out the colour scheme for real, by painting the lower section of the front of the house. I reckon it looks pretty cool - what do you think? I started here, just to keep my spirits up while I begin this long process, but I still have to assemble some basic scaffolding to help me reach the tops of the walls.
デッキと一緒にBBQセット、ハンモック、8人用テーブルとベンチができましたけど、最後にデッキチェアが欲しいですね。ただし、デッキとデッキ用の家具は全部手作りでしたので、今回デッキチェアを買います!
The deck is now complete, with a surrounding fence, a big BBQ set, a huge 8-person table and chair set, and a hammock.... but to finish it off I also wanted to have a couple of sunloungers at the front.
Since everything else on the deck is fairly cheaply handmade in my slightly wonky "meh, it'll do" DIY style, for these chairs I decided to spend a little money and buy some nice ones!

▲ 何か月もかかりましたが、やっと日本へ送信できる販売店を見つけました。アメリカのEbayから買いましたが、ベトナム製だそうです。2個で送料は8000円でした。
After a few months of browsing chair designs, I found this elegant foldable S-shaped design. After a few more months I finally managed to locate a seller willing to ship overseas (for $80), and ordered a set of two from Ebay. The store was in the US, but the chairs seems to be made in Vietman, from lovely warm acacia wood. I added some sheepskin rugs on top for comfort and warmth on those chilly Aso evenings.

▲ 真ん中のテーブル板がアマゾン.jpで買って、DIY店ハンズマンから25cmの脚3本を付けました。
The cute little side table was a chunk of wood found on Amazon Japan, smoothed and varnished, with some short foldable metal legs from my local DIY store. I think the gentle curves of the table and chairs help to soften the straight lines and edges of the deck and house, no?
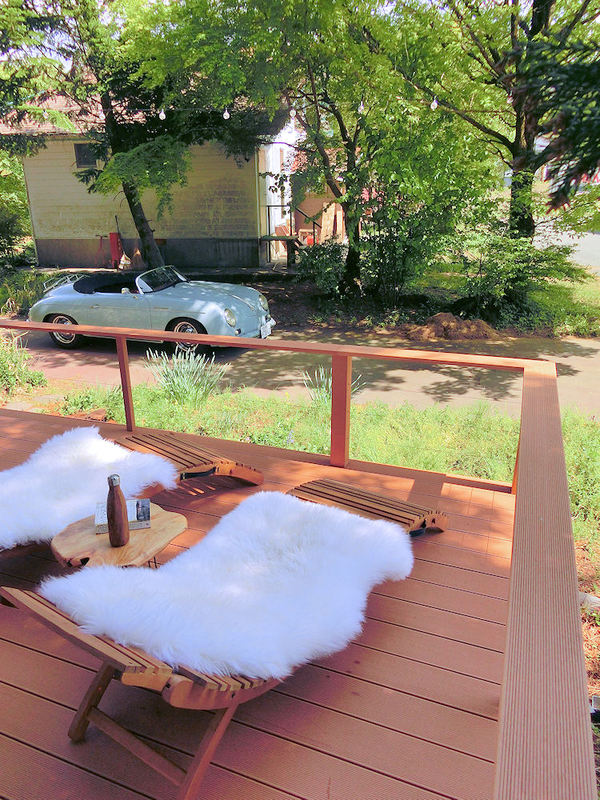
▲ 気持ちいいよ!
At last, the deck looks great!
昨日のテーブル作成の続きです ー 今回ベンチシートを作ります!
Following on from yesterday's blog about building the tables, today I tackled the bench seats to go with it!

▲ テーブルの周りに置きますので、シートも4つに分けて八角にデザインしました。人工木材36枚ほどあります。足りるかなぁ?
Since these 4 seats are going to be arranged around the table, I designed them to match the octagonal shape. I have 36 planks of artificial wood left in the cut-off pile, so I hope I have enough to last the project!

▲ 1個目のシートが完成!あと3個です。。。
The first of the seats goes together quite smoothly, and looked good enough to me. So I cracked on with the remaining 3 seats...

▲ 四つのシートを並ぶと大きいテーブルですね!
At last - done! The finished tables with all the seating!

▲ 電気コンロの場合はこんな感じです!高さ的にちょうどいいですね。
Ready for some casual grill dining! The height of the grill blends pretty well with the level of the table, so you don't see where I broke it years ago!

▲ 普段は二つのテーブルに分けて、柵の横に置きます。今はハンモックしか置いていないんですが、庭が完成したら景色がきれいになると思う。
Normally I'll be splitting the big table into two halves and storing them at the side of the house like this. That way they can still be used for sitting out on the deck, and I'll be able to walk past them and use the open corner of the deck for some sub-bathing deck chairs!

▲ 杉の影がお日様が気持ちいいです。
The afternoon sun comes through dappled very prettily, thanks to the big cedar-pine trees alongside.

早くペイントしたいなぁ!
I can't wait to get started on the exterior painting of the house - the last big job for now!
デッキと柵が終わりましたので、次はデッキ用の家具ですね。できるだけ安くしたいので、DIYで作ります!
It's time to make some deck furniture, and I'm keen to keep the budget down wherever possible.

▲ デッキを作ったときから長さ70cmほどの人工木材板を90枚も残っています。これで大きいテーブルと椅子を作りたいです。
I have a stack of about 90 short planks of this artificial wood, which were trimmed off the edge of the deck floor when I made it. Each one is only about 70cm in length, but my plan is to come up with a design which uses these cut-off pieces, and thereby keep costs to a minimum.

▲ 作る前に3Dモデルのソフトでデザインを考えました。八角の形で作ったら、短い板はそんなに問題にならないんですね。だけど本当にできるかなぁ?
This was my table design, as modelled in 3D software. It's an octagonal shape, which should have plenty of space for 8 people with an electric grill plate in the middle, for occasions when we choose not to use the big BBQ instead.

▲ 8人用のテーブルが結構大きいですので、半分に分けたら4人用のテーブル2台もいいかもしれない?
Of course a table with seating for 8 people takes up a lot of space, so I also designd it to split into two halves, and so normally these could be placed against the edge of the deck as two tables, each with seating for 4 people.

▲ まずは同じ人工木材のテーブルフレームで作りました。この形なら2つのテーブルにも分けることも可能です。
I bought some thin posts of the same artificial wood to make the table legs. You can see that it's constructed in two mirrored halves.

▲ テーブル台の大引きも同じ風に作りました。
I used a couple more beams as the supports for the tabletop.

▲ これは一番下のテーブル台です。2つのテーブルを一緒に使えば、真ん中に電気コンロも入れたいので、これはその電気コンロの台となります。
This was the first of 3 tabletop layers. This layer is the bottom layer, and is just designed to support the electric grill in the middle of the table, when both halves of the table are placed together.

▲ 次は電気コンロの周りに台をサポートする板を載せました。
The second layer surrounds the central grill space, and provides support for the many separate pieces of the tabletop.

▲ このステージで外に運んで、作業がデッキで続きました。一番上のテーブル台を始めました。
At this stage the tables were getting quite large, so I moved construction to the deck outside, before they became too large to fit through the balcony doors!
The tabletop is constructed from 4 concentric rings, each of 8 separate pieces. I started with the third ring.

▲ その中にまた板をはりました。
Then I moved to the second ring, inside the completed 3rd ring.

▲ 一番小さい板で電気コンロを囲まりました。
After that I cut the pieces for the innermost ring, and checked the electric grill still fits!

▲ やっとその周りに最後のテーブル板を載せました。
Then finally I was able to finish the outermost ring of the tabletop. It's a pretty big table!

▲ 最後に、真ん中にカバーを載せました。電気コンロが家の中に置きますので、使いたいときだけカバーを外します。
続きには椅子を作ります。。。
The last step was to make a cover for the central circle, in two halves, so that it looks like a regular tabletop when not being used for cooking.
The next blog will be about making 4 bench seats to surround the table! Phew....
1階のホールにはまだ家具があまりない。ベンチ形のソファ2台作りましたが、今回テーブルを作成します!
相変わらず安いパインの2x4で作ります。大体2時間かかりました。
The big hall room downstairs is still lacking some furniture, so it's time to make some cheap and easy tables to go with the bench sofas. As usual I've gone with the simplest and cheapest option of using pine wood 2x4s to knock these together, in a couple of hours each.

▲ テーブルの脚とトップを別々に作成します。理由はちゃんとありますが、後で説明しますね。まずは2x4の4本を写真のようにカットしました。
The leg section and the tabletop section will be constructed separately, so here's what I cut from four 2x4s to make the leg section for one table.

▲ 長い75mmネジで組み立てました。この形はそんなに強くないんですが、多目的テーブルとなります。写真のようで使えばローテーブルになります。しかし、90度回転すると机ぐらいの高さになります。
It was a pretty simple process to screw these 2x4s together into a simple box shape. You'll notice that the rectangle frame at each end is not quite square in shape. That's deliberate, so that you can use the table as a low table when you want to .... or you can rotate the leg section 90 degrees to make a higher table.

▲ トップは18mmのブロックボードです。120cmx90cmにカットして、周りに1x4で囲まりました。この部分も多目的でもなりますですね - 写真のようにも使えますし。。。
I used a 120cm x 90cm cut of blockboard (two sheets of thin veneer with light wood in between) as the tabletop, with some 1x4 planks carefully cut to size and screwed to the outside. Well, actually this is just the inside tabletop, and not the final tabletop, as you'll see from the next photo...

▲ 。。。もう一枚のトップ部分を入れたら、普通のテーブルとなります。これは1x4で作成しました。
I also made this second, higher tabletop surface from 1x4 planks, which can be slotted into the surrounding frame to make the table into a regular, normal table.

▲ 普通のローテーブルの形です。このトップを取るには指を入れるところが必要でしたので、真ん中に4cm穴をあけました。花瓶で隠すつもりです。
Here's the completed table in its low version, after it was woodstained with a slightly reddish walnut colour. The thing about having a removable top for the table is that you also need some way of lifting it out, so I cut a 4cm hole right in the middle, for me to put my fingers into to lift it out.

▲ ゲーム用のローテーブルの形です。ボードゲームなどをするときにダイスやフィギュアが床に落とさないように周りの壁が便利です。
This is the low version of the table, with the top removed. This is ideal for playing boardgames or miniature wargames (as pictured), as the surrounding frame keeps dice and figures from rolling onto the floor, and is a fairly safe place to put drinks and snacks too.

▲ 部屋の雰囲気がこんな感じになりました。こっち側の椅子が大きいヒノキの巻き。
The hall room's looking pretty good now, with two bench sofas against the walls, a woodburning stove in the corner, and two tables. These can also be placed together to make one larger table, of course. The seats on this side are just thick stumps of Japanese cypress, sanded smooth.

▲ 真ん中の指を入れる穴を隠すために、3Dプリンターでカスタムの花瓶を作りました。花瓶を入れるとカワイイテーブルになったでしょう?
Here's my idea for disguising the hole in the middle of each tabletop. I designed a quick vase shape to fit the hole (and another 6cm down inside), and 3D printed them from white plastic. They look pretty good with some simple wild flowers, I think.

▲ これで1階のホールがとりあえず使えるようになりましたので、今度からデッキ用のBBQテーブルを作成します!
With these tables done, the next job will be to make a large BBQ table for the outside deck! Watch this space...
〒869-2226 熊本県阿蘇市乙姫2070-48
Aso City, Otohime 2070-48
Open from 13:00~17:00*
Fridays & Saturdays
(* if the door's closed, we might have popped out to walk the dog... back soon!)


")
Painted models available 塗装済の模型発売中!
Making garage doors ガレージの扉DIY作成
New side-project... a hobbit house! ホビットの家
Shops added to the shop ショップにお店
Repainting a (mini) car ミニカーのリペイント
Buying land in Otohime 乙姫で土地探し
Scale model of the Inaba Residence 稲葉家下屋敷の模型


 Shrine
 Temple
 Teahouse
 Castle
 Shops
Shops Houses
 Farm
Farm Other Buildings
 Walls & Fences
 Bridges
 Ponds
Ponds LED Lights
0 Comments :
Write a comment :