


3D-Print Studio
5月にペイントを始まったが、それから阿蘇の梅雨に入りました!そして、6月にまたペイントを続きました!
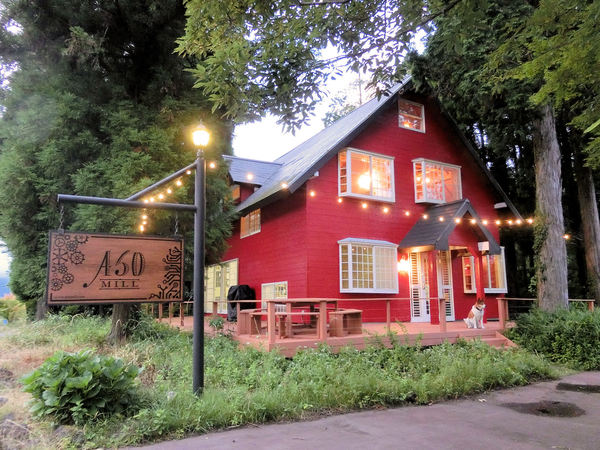
Okay, it's time for a BIG transformation. Most of the interior is now complete, so it's time to finish the outside of my $35,000 house!
I started a little bit of the painting in May, just to see how it looked, but then the early start of rainy season delayed things rather a lot. But during the dry gaps in June, I managed to get cracking and finish this....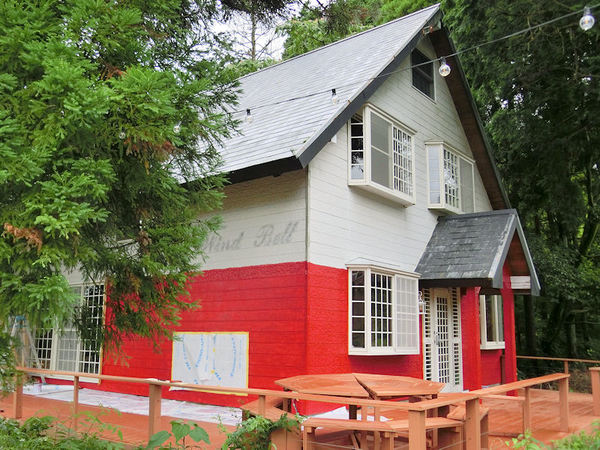
▲ ペイントは一回塗り用のペイントですがやはり正面は二回塗ったほうがいいですね。コーキングのところが多かったので、コーキングの上なら2回が必要場合もあるみたいです。まずは下のほうを一回塗りました。マスキングテープいっぱい使いました!
The paint is a thick acrylic crimson-red, with a little latex included to allow for shifting and stretching during hot and cold months. It also covers very well, with one coat usually enough, although I found that on a few areas where I'd gone heavy with the silicon caulking (to fill joint gaps and cover small cracks) it actually benefited from two coats.
I started with the difficult sides of the house, at the back, just to get it out of the way, and then I could actually start to enjoy painting the 'public' sides of the house facing the road.
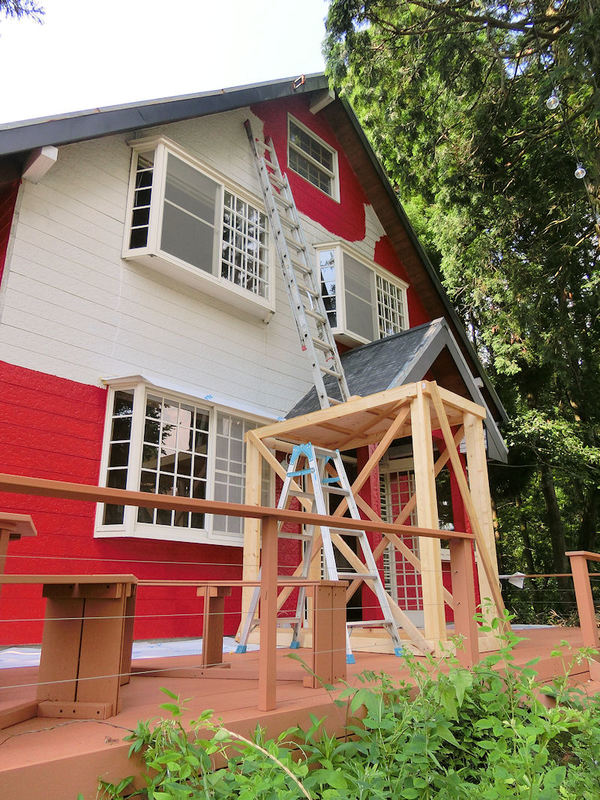
▲ 次は上のほうでしたが、阿蘇には足場のレンタルはなかったから自分で作ってみました!1.8mの足場を2x4で一応作りました。上のほうに厚いコンパネを置きました。最後に長い梯子を立てましたので、梯子の脚のところに動かないようにフレームを作りました。この木材足場で地面が2メートルほど上がりましたので、梯子を上ったときにほとんどの壁まで届けました。
鉄の足場レンタルは熊本市にあるかもしれないが、大体1か月で20万円で借りれるだそうです。それはもったいないし、天気次第遅くなる恐れもありますので、この木材足場は約1万円で作成できました。
壁を終わったら玄関の小さい屋根もペイントしました。せっかくですので、30年間の汚れ(と錆)を隠せました。
The top walls of the house at the front and back are pretty darn high above the ground, sadly too high for a ladder! That top window in the photo is actually the loft window, and to get up that high I really needed some scaffolding. Unfortunately, there were no companies locally who rented out metal scaffolding, so I had to get creative.
So instead of going MUCH further afield and renting an entire set of scaffolding (approx $2000 for one month, plus delivery, and I might still be delayed by weather!), I knocked together this wooden box scaffolding together for about $100. It's just a simple wooden frame made from 2x4s, sturdily put together, with a thick plywood top on which the ladder could be placed. I added slots on top, so the ladder would not shift or slide. Even so, it was pretty nerve-wracking sometimes to climb all the way up to the top of that tall ladder!
After much sweating and effort, I managed to finish all the walls, and as a last touch I decided to quickly repaint the small roof over the door, to get ride of a few rust patches and discolourations from the last 30 years!
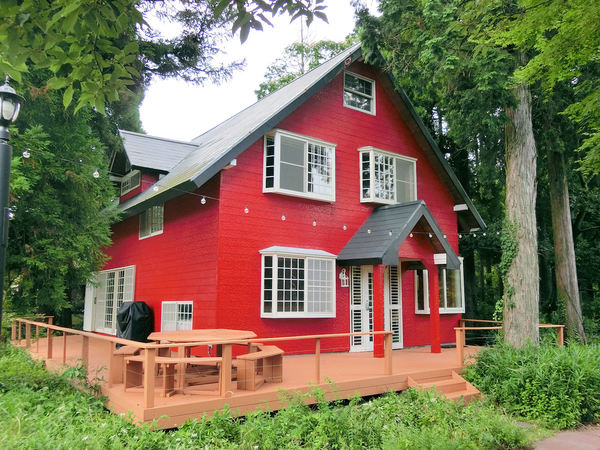
▲ 梅雨の中ですのでちょっと時間かかりましたが、2週間後にやっと完成できました!
いかがでしょうか?いいでしょう?!
It took a few weeks to fit it into mother nature's rainy schedule, but the house was at long last repainted!
Look at that - it's like a completely different house!!

▲ 会社に頼んだら大体100万円になるんですが、今回DIYでするとたった5万円でできました!
足場:1万円
ペイント:33,000円(2万円ほど使った)
テープやブラッシュなど:5,000円
合計:50,000円!
I saved a whole stack of money by painting the house myself. A painting company would probably charge around $10,000 to do the job (erecting scaffolding is a large part of that, of course), but I managed to do it for about $500. The paint was $300, the scaffolding was another $100, and the rest was spent on masking tape, brushes and sheets etc.
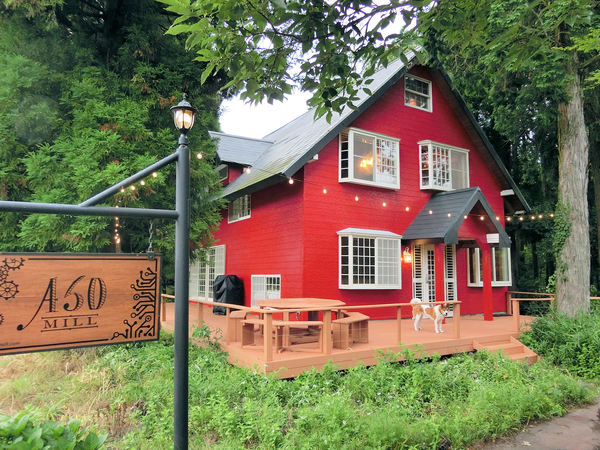
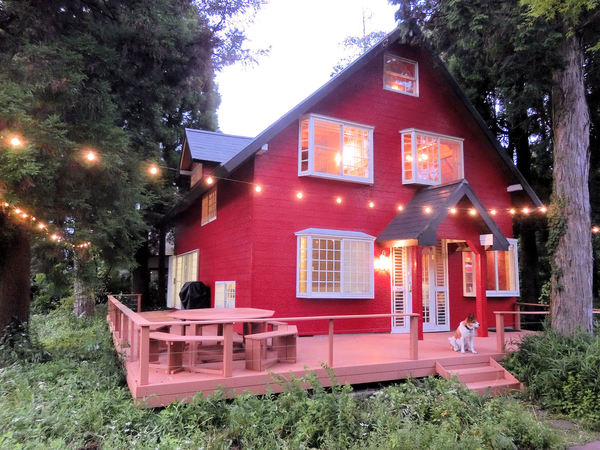
▲ 外のライトをつけると綺麗!
I love turning on the deck lights early.
▲ ケイティちゃんはどうでもいいみたいですが(!)、ポーズできました!
Katie seems rather indifferent to the new colour, as always, but she still sat for a posed photo!
▲ 今まで買ってから2年間になっていますが、だいぶ変わりましたね。違う家みたいです。
あと、庭をきれいにできたらリフォームが完成となります。
It's been a long journey to pull this house back over the last 2 years, but it has been worth it. With a new bathroom, new kitchen, new interiors, a massive new deck and a new paint job, it's like a totally different beast now!
Next job will be the garden, I think, and then the house will be pretty much done.
1階をもうちょっときれいにするために下駄箱を作りたかったです。ただし、玄関にシューボックスを置いたら格好悪いので、ホールの棚に入れます。
In an effort to make the downstairs hall look a little nicer, I've decided to add a shoe box. Every Japanese home has these in the genkan, and it helps hide all those grotty shoes, but sticking a large cupboard unit in the genkan (entrance) of this house would look terrible, should I ever decided to turn it into a workshop open-to-the-public shop!

▲ 棚に靴をそのまま置いたら嫌ですので、扉を作ります。他の収納はスライド式になっていますが、できるだけ同じように作りたいです。
まずは、ごみ用の木材から材料を取ってフレームにしました。
So I've decided to utilise one of the empty shelf spaces in the storage wall adjoining the genkan, but need to build a cheap and cheerful hinged door to hide the shoe shelf. I started by raiding my pile of junk wood, to find some pieces suitable for a simple door frame.

▲木材ボンドが乾いたら、強化するためにネジも入れました。
Once these had been cut and glued together, they were also screwed tightly together too.

▲最後にベッドルームのフローリングから残っていた木材を正面に使いました。フィットはちょっと適当ですが、別に気にしていないです。
The last stage was to grab some leftover flooring pieces (from the upstairs bedroom), and nail/glue those into place.

▲ 右側は靴箱になります。左側はBBQ用のミニ冷蔵庫。サイズはぴったりですね。
For couple of dollars (for the hinges), and the rest being repurposed wood, this was a cheap and simple project. The door (on the right) matches the other sliding doors closely enough, and the minifridge (for BBQs) fits neatly on the left. Easy!
今年梅雨が早く始まったので、外での作業があまり進んでいない!その代わりに1階のホールの作業準備をしていました。
今回はライトですね。現在、管蛍光灯は4つあります。結構明るいですが、もうちょっと面白い形の照明に変更したいです。
Rainy season started 2 weeks early this year, so I've accomplished very little since then. Instead, I've turned my attention to the downstairs hall.
Currently the hall has 4 double fluorescent light strips, on two separate switches. While this is nice and bright, it's also a white light, which doesn't gel so well with the image I'm going for. It's a bit too functional.

考えているのはこんな感じです。昔からシャンデリアが好きだったが、天井がちょっと低いです。レールのライトも好きですが、カーブの形が高すぎてます。
この自作ライトが直径3メートルになります。2階のオフィスにある照明と同じ風にエジソン形のLED電球18個使います。スタイルはレトロっぽいかな?どう?
I've come up with this light design. It's a mix of chandelier (ceiling is a little low for a full chandelier) and track light system (curved designs are stupidly expensive). I'll be 3D printing it in 30cm sections, and lighting it with 18 LED bulbs hanging from industrial-retro brass fittings. The whole thing will be 3m in diameter, and hopefully look awesome, but it will also cut the power consumption from the current 320 watts down to about 100 watts. That's a win, right?
1階の床はちょっと寒いので、ラグを買いたかったんです。阿蘇の自然の中には牛のラグが似合うと思ったので、まずはイケアの牛革を探していたが、なかなかいいのはなかった。
The downstairs hall edges closer to completion, and I wanted to add some extra warmth and comfort to the interior. So I decided to look for a large cowskin rug for the floor, but I was unable to find any interesting ones at Ikea - they tended to be one-tone dark brown or black. 
この2平方メートルの牛革ラグをEbayで見つけました。ブラジルの販売店「hype_deco」からたった7,600円で買いました。送料は3500円でした。ケイティちゃん(犬)が好きそうですね!
Happily, I thought to try Ebay, and found this wonderful quality 2m² rug from a Brazilian seller 'hype_deco' for only $70!!$30 for shipping was pretty reasonable too, I thought, and certainly beat the $300+ pricetag you might expect to find in Japan. Not only is the quality superb, the brown and white pattern is so much more interesting to the room's scheme. It even looks vaguely like Katie's fur!
すっと前からこの作業を楽しみにしていました!薪ストーブの後ろにある壁の上に防熱シートを付けましたが、高熱に強いタイルも張りたいです!ただし、人生に一度しかできない作業ですので、普通のタイルならチャンスはもったいないよね?モザイクタイルでユニークなデザインを作りたいです!
A fun little activity this, so I'd been looking forward to it quite a bit! It was time to finish up the logstove area of the downstairs hall, by tiling the back walls behind it. But I didn't want to waste this opportunity by tiling the walls with neat, boring lines - instead I decided to try some mosaic tiling!
▲ 楽天の余剰タイル店で色んなタイルを買ってみました。サイズと色はバラバラでしたので、いいかなぁと思ったんです。最初にはタイルをハンマーで割れました。
Hmmm. Mosaic tiles in Japan are stupid expensive, especially for an area this large. So I decided to make my own, and ordered a variety of pale blue and pink tiles from a Rakuten store online, then had some fun carefully smashing them into smaller pieces with a hammer!

▲ タイルのアレンジは一応床にしてみました。デザインには4枚のグラス皿も入れたいので、適当にアレンジしました。
To ensure I got the right balance of colours (and quantities of tiles), I drew out the lines on cardboard and arranged them there as a test. As some extra focal points I also added some glass dishes with metallic flecks that I had purchased online.

▲ じゃ、これで行きましょう!
Looks good to me - time to start transferring the design to the wall!

▲ 次は壁にタイル用の接着剤を張って、ちょっとづつタイルを張りました。
I used about 4kg of tile adhesive to cover the two square metres of wallspace, and then started to transfer the tiles from the floor to the wall.

▲ ちょっと時間かかりましたが、やっと終わりました。翌日に灰色の目地材を入れました。
After a couple of hours, and some extra fill-in tiles here and there, everything was stuck to the wall and left to dry. The next day, I used another 4~5kg of grey grout to fill in the gaps between tiles and strengthen everything.

▲ 完成です!ちょっと美術風にできましたので、嬉しいです!
Yay, done! My interior style tends to be a bit geometrical, so it was nice to be able to introduce this rather looser, arty style to the room.

▲ これで薪ストーブの部分が終わりました!
With this job done, that corner of the room is now complete!
〒869-2226 熊本県阿蘇市乙姫2070-48
Aso City, Otohime 2070-48
Open from 13:00~17:00*
Fridays & Saturdays
(* if the door's closed, we might have popped out to walk the dog... back soon!)


")
Painted models available 塗装済の模型発売中!
Making garage doors ガレージの扉DIY作成
New side-project... a hobbit house! ホビットの家
Shops added to the shop ショップにお店
Repainting a (mini) car ミニカーのリペイント
Buying land in Otohime 乙姫で土地探し
Scale model of the Inaba Residence 稲葉家下屋敷の模型


 Shrine
 Temple
 Teahouse
 Castle
 Shops
Shops Houses
 Farm
Farm Other Buildings
 Walls & Fences
 Bridges
 Ponds
Ponds LED Lights
0 Comments :
Write a comment :