


3D-Print Studio
結構時間かかりましたが、やっと1階ホールの断熱材入りの天井が完成できました!夏から続けて工事をしていましたが、やはり思ったより時間かかった。これで1階も2階もちょっと暖かくなりました。
So this took quite a long time. The skill level is about a 2, but the pain-in-the-ass level was about a 5, I think! So many darn panels to cut to size. I've been working on this ceiling since the summer (a couple of hours at a time in the evenings), but it's finally finished - and the downstairs and upstairs should have a better chance at staying warm tis winter.
次回の作業はこの部屋の大型シャンデリアになります。頑張りましょう!
Next project for this room will be the big chandelier light in the middle. Something a bit more fun, I hope!
1階の壁に動物トロフィーを飾ろうかなぁと思ったが、もちろん本物の動物なら載せたくないよね?ということは今回、3Dプリンターで作られたトロフィーを載せました。
In the downstairs hall I wanted to add a couple of animal trophy heads on the wall, to make a log-cabin kind of feel. But obviously I wasn't going to put real stuffed animal heads on the wall, so instead I printed a couple of realistic trophies in white plastic on the 3D printer.
まずは鹿野の頭ですね。。。
First up was the deer head, whose name is Bambi...
そして、猪の頭も作りました!
And then we have Miss Piggy, who is another animal (well, a boar to be exact!) we get around here. Haven't seen one yet, though!

白いプラスチックで面白いかもね!
I think they look great in white plastic against the natural wood, and contrast well with the black far wall.
昨日阿蘇山が噴火しました!草千里のカメラから撮影されたビデオがすごい!
So yesterday morning Mount Aso, Japan's largest active volcano, blew up a bit. Watch the video from the nearest tourist spot below, which is only a couple of kilometres from the house. The video's pretty much realtime, which is pretty frightening. Hopefully it'll just be a lot of ash, and nothing worse....
冬に2階のほうでまたDIY床暖房を増やしたいと思いますので、そのために1階のほうでちょっと準備をします。
1階の天井板が2階の床板と同じものです。たった12mmぐらいの床材だけですので、2階に床暖房をつけても熱が保存されないんです。ということは今回、1階の天井に断熱材を入れて、10センチほど下にまた新しい天井を作ります。ちょっとめんどくさいですが、頑張るしかないんです。。。
This winter I plan to add more DIY underfloor heating to the living room upstairs, so my project for this summer is to do some work downstairs. Confused?
Yes, that's understandable. You see, the floor for the upstairs room IS the ceiling for downstairs. Yes, that's right - 12mm of wood planking is all that divides upstairs from downstairs. Apart from hearing every footstep (or Katie's claws) from upstairs, there is absolutely NO heat insulation at all. So even if I were to add underfloor heating to upstairs, the room wouldn't retain much heat.
So the plan is to create a new false ceiling downstairs, about 10cm lower than it currently is. I can stuff heating insulation into the gap, and hopefully that should help sound and heat insulation for all rooms. It's a bit of a pain, but a cheap and easy project - just a bit time-consuming, that's all!
▲ 只今、1階の天井がこんな感じです。天井の雰囲気が結構好きですが、このままだと床暖房を使えないんですね。
This is the current state of the downstairs ceiling. I quite like its woody simplicity, but if I don't change it I won't be able to install heating upstairs. So here goes....

▲ まずは近くのDIY店から2m長さのやすい木材を80本買いました。合計8000円ほどでした。
大引きの間にパネルを張りたいですので、各所に天井から8cmの深さで木材を釘で張りました。写真で見えますかね?これでステップ①が完成でした。
I bought about 80 cheap strips of 2m-long wood from my local DIY shop, and nailed them onto the support beams at a height roughly 8cm below the current ceiling. You can just about see the new strips of wood in the photo above. This was quite a tedious job, because I have about 50 separate panels to do for the whole room. Oh well....
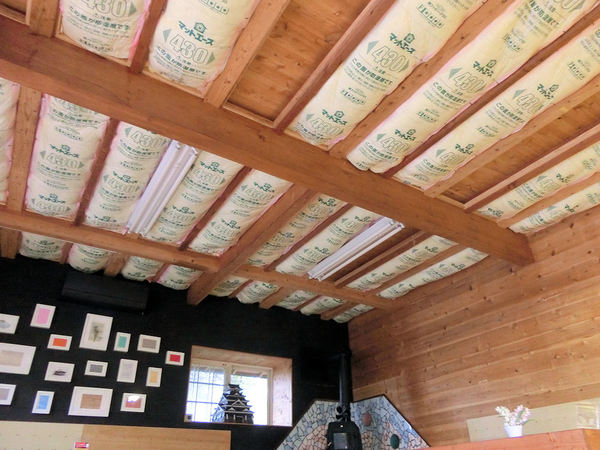
▲ 次はステップ②です:断熱材。10センチ厚みの断熱材をホチキスで書くスペースに張りました。
Step two was rather a messy and hot job, because it involved stapling rolls of fiberglass insulation into each of the panels. So I scared the neighbours by stripping down to shorts and sweated away!

▲ 最後のステップ③が新しい天井パネルです。ただし、50枚ほどのパネルを切らないといけないので、時間を節約できる道具を作りました。ロータリーカッターをちゃんとまっすぐ切れるトラックをDIYで作ってみた。このトラックを板に固定するとラクラクきれいにカットできました。
The final stage of the project was to add new ceiling panels to each of the 50 spaces. I really wasn't looking forward to doing this time-consuming part of the build, so I made myself a time-saving tool to help. This is a saw track for my rotary saw. It's simply made from a straight plank, with some straight strips glued on top. A thin panel and corresponding strips are temporarily attached to the circular saw, so it can smoothly slide along the plank and cut perfectly straight lines. Yay! Thank you, YouTube! For maybe $10 in materials, this worked really well!
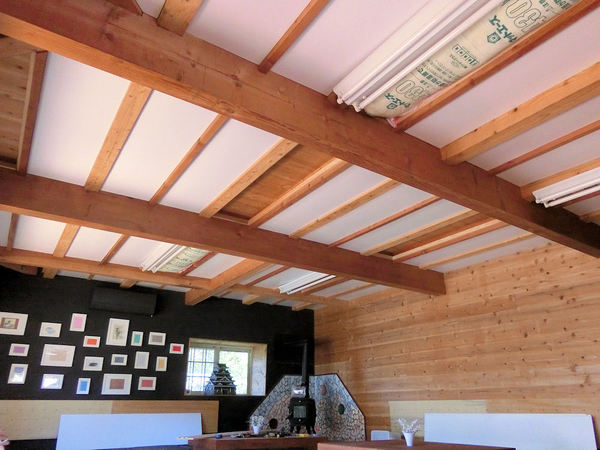
▲ ステップ③のパネルが多かったから結構時間かかりましたが、どうですか?なかなかいいじゃないんですか?
これからライトの電気配線工事と移動も必要となりますので、まだまだ完成じゃないんですが、これで満足です。部屋の雰囲気もちょっとだけ明るくしました。
次はライトの作成ですかね?!
Carefully cutting each panel to size and nailing into place took quite a while, but I like how it turned out.
I haven't quite finished all the panels yet, because I need some access to a few of them in order to relocate the ceiling lights and wiring, but overall I think it looks decent enough - and it even seems to have added a little more light to the room.
I think the next project will be to add the new giant light fixtures - all 18 of them!
今年の雨は長かった!8月に阿蘇に戻りましたが、翌日から3週間ほどの雨でした。ということはガーデニングをあきらめた!
その代わりに1階の内装リフォームを続きました。今回の工事が「3Dプリントのアトリエ」への準備を始めました。ご来店する方のために動いているプリンターが結構面白いと思っていますので、2台を設置する予定です。1階のホールの棚に置きますが、ちょっと変更が必要でした。。。
This year's rain never bloody stopped! I arrived in Aso for the summer in August, and it started raining the very next day. It didn't stop for even 30 minutes... for the next 3 WEEKS! So I gave up on my plans to do some major gardening, and instead concentrated on the ground floor hall.
I've decided to perhaps try a little workshop and display/shop space, open to public walk-ins (assuming we ever get tourists back to Aso! Thanks, earthquake + floods + landslides + covid19!). One of the best things about 3D printing is actually watching them work, so I intend to fit 2 printers where people can see them, but first I need to do a little basic DIY...
▲ この棚に置きますが若干小さい過ぎです。後ろの壁が玄関の壁になりますが、プラス10センチほどを大きく切るとフィットします。
This is one of the shelves in the downstairs room, backing on to the genkan (entrance hall). It is almost big enough to house 2 printers, but I needed to extend the back of the cupboard space about 10cm into the dividing wall.

▲ カットした穴を簡単に木材壁を張りました。そして、真ん中に新しいコンセントを作りました。
With the extra space cut, I quickly patched up the holes with spare plywood, and then added a new electrical socket in, too.

▲ 1台目のプリンターがよくフィトしますね!
Test fitting the first printer was quite a relief - it fits!

▲ ただし、ほこりと寒い部屋が苦手なプリンターにはドアが必要です。ネットのほうからカットされたアクリル板を注文して、磁石でつけました。最後に周りにLEDテープライトも張りました。写真は「WHITE」のボタンだけど白ではないと思いますね。ちょっと残念!
However, my work was not done yet. 3D printers are a little susceptible to temperature fluctuations, and that room does get chilly in winter with no heating. So, to keep the heat contained around the printers, and to keep out dust, I fitted this sheet of 3mm acrylic over the front, and secured it in place with magnets.
To finish it off, I bought a cheap strip of LED tape lights, and stuck those around the sides to give it some task lighting and a bit of pop!

▲ その代わりに色のローテーション設定のほうが楽しいでしょう! PINK....
The LED lights have a few fun settings, and my favourite is definitely the rotating rainbow of colours.... from pink to....
▲ .... BLUE....
▲ .... GREEN!
Cheap & fun = best!
〒869-2226 熊本県阿蘇市乙姫2070-48
Aso City, Otohime 2070-48
Open from 13:00~17:00*
Fridays & Saturdays
(* if the door's closed, we might have popped out to walk the dog... back soon!)


")
Painted models available 塗装済の模型発売中!
Making garage doors ガレージの扉DIY作成
New side-project... a hobbit house! ホビットの家
Shops added to the shop ショップにお店
Repainting a (mini) car ミニカーのリペイント
Buying land in Otohime 乙姫で土地探し
Scale model of the Inaba Residence 稲葉家下屋敷の模型


 Shrine
 Temple
 Teahouse
 Castle
 Shops
Shops Houses
 Farm
Farm Other Buildings
 Walls & Fences
 Bridges
 Ponds
Ponds LED Lights
0 Comments :
Write a comment :