


3D-Print Studio
アトリエの店をもうすぐでオープンしますので、お土産として小さい3Dプリントでできている商品をこれから準備します。お土産ならちゃんと袋なども用意しないといけないので、店名・ロゴが入っているスタンプを作ってみました。
I'm planning to open the studio as a little shop shortly, so I'm currently trying to get things ready for that. In addition to a basic register and music system, I need to prepare some simple bags for anybody buying small items. The local 100-yen shop has excellent small plastic and paper bags, and I wanted to see if it was possible to create a logo stamp using the 3D printer....
▲ スタンプは6cmほどになりますので、ロゴのデザインをちょっと変えました。そして、3Dプリンターでこのスタンプを作りました。もちろん反対に作らないといけないので、これはちょっと失敗でした。でも形がフラットですので、きれいに押せないんですね。ゴムじゃないから、形がちょっと丸く作らないとね?
The stamp needed to be about 6cm to fit on the stamp pad, so I had to simplify a few elements of the logo so everything was slightly blockier and larger. Then I set the printer to work on this stamp (which I forgot to reverse - oops!). It worked okay, considering it's printed in hard plastic rather than rubber, but it was hard to get uniform pressure everywhere when pushing down on the stamp.

▲ バージョン2.0です!ちゃんと逆にした上で、ちょっとカーブがある形にしました。これでゆっくりロールしながら押せるかな?
So I created this second version of the stamp, which (in addition to being reversed properly) was put onto a curved block. For those interested in designing a stamp like this, it's was actually surprisingly easy - 10 minutes to create a large cylinder in 3DBuilder, then slice a chunk off, and then emboss a PNG file of the logo onto the curved surface. Much, much easier than I expected!

▲ まぁ、これで行けるかなぁ?
This was the end result. Not perfect (a couple of places were too thin to print and stamp clearly), but I'm happy enough with that.

▲「乙姫」て書いているランタンを準備しました。ボタン電池とLEDのセットですので、子供でも簡単に作れるお土産商品となります!
I've designed a new version of my popular lantern model, with the kanji characters for "Otohime" written on one side, as a little souvenir item. I'm planning on selling this as a set with an LED bulb and button battery, simple enough for kids to quickly push it together and have a flickering lantern on their desk! With the logo-stamped bag it looks cute!
今日はアトリエの展示品を見せようかなぁ!
The house and studio are completed (for now!), so I thought today I'd show off a few pics of the items on display downstairs.
ドアを開けるとこんなもんが並んでいます。。。
Ironman greets you as soon as you step in the door. 
戦国時代の模型モデルがメインですが、これからアイアンマン仮想などの作品も展示しようと考えています。
Most fo the items currently on display are the historical architecture models, as I'm super proud of those!
本物の甲冑もありますね!
Turning to your left, a genuine suit of armour sites in the corner, and Katie the dog will be barking to greet you too!
只今、お寺の作品がいっぱいです!ぜひどうぞ見に来てください。
So many temple pieces on display at the moment! Come take a look!
家から歩いて2分で桜の道が咲いています!素敵な景色の中で、桜のトンネルになっています。ぜひ、「乙姫子安河原観音」への道を見に来てください!
Just 2 minutes walk from the house is a small, winding road leading to a shrine, which looks stunning every spring. Woods on one side of the road, and rolling fields and a view of Aso volcano on the other side, the cherry blossom tress make a tunnel of light pink blossoms at the start of April. 
I couldn't resist taking a couple of pics of the car on this picturesque road!
1階のアトリエ/リビングがあとちょっとだけです!ソファの後ろに壁掛けクッションを作ろうと考えています。
The first floor's main room, which I'm using as a studio display space most of the time (but also as a large living room when friends visit) is very nearly finished now! The last thing I need to do is add some back cushions to the long sofas.

▲ 安い板と2x4でクッションのボディを作りました。
I decided to make long cushioned boards, to hang along the walls above the sofas, so I started with some cheap plywood and cheap 2x4s to make the body.

▲ 次は壁に掛ける「フック」を作りました。板を斜めに切ると簡単な「French cleat」のフックを作った。
Next I needed a way to hang these long cushions on the wall, so I cut strips at a 45 degree angle, in what's known as a French cleat.

▲ 半分をクッションの裏側に付けると。。。
I attached the bottom half of each strip to the wall....

▲ 。。。残りの半分を壁に付けます。
... and the top half of each strip to the back of the board.

▲ 載せるとこんな感じ。
Then it's easy to drop the board into place, and the angle of the cut will push the board tightly against the wall. Simple!

▲ ダイヤモンドのパターンでボタンもしたかったので、ボタンの穴位置を書きました。
I also wanted to make a diamond pattern with buttons, like those you find on bed headboards, so I marked a diamond pattern of holes....

▲ ドリルで穴を開けて、ボタンの糸を通れる穴になります。
... and then drilled them out. The string for each button would pass through each hole.

▲ クッション用の綿が結構高いみたいですので、要らない断熱材を使ってみました。上に座れるクッションであれば、絶対利用できないんですが壁に付けるタイプであればどうかなぁ?
Next came the padding. I found that cotton or sponge stuffing is very overpriced in Japan, especially for something as long as these backboards (almost 3 metres each!), so I chose to try using some leftover rolls of fibreglass insulation material.
This wouldn't work for normal cushions, because they'd deform when sat on, but it should work okay for cushions just hanging on the wall. I hope?!

▲ 人工革の布を店で見つけました。裏側にホチキスで固定しました。
ここでとりあえずボタンなしでやってみます。数か月後にボタンを付けるかもしれませんが、しばらくこれで行こうかな。
I found some good quality fake leather in a material shop, and stapled it on the backside, around the edges.
At this point I decided to leave off the diamond pattern of buttons for now, and see how they look without. I may revisit this at some point and add the buttons, but for now it will do fine!

▲ 壁に掛けるとこんな感じになりました。やった!
So instead, I just slipped the boards back on their hooks, and it was done!

▲ とりあえず、1階のアトリエ部屋が完成!いい感じでしょう?
So for the moment, the room is now finished, and I think it looks awesome! What do you think?
日曜日に南阿蘇のほうでドライブしてみました。目的地がなく、道は適当に選んだんだけど、突然この観光スポットを見つけました。
I was out driving the country roads to the southeast of the Aso area on Sunday, enjoying the unseasonally warm and sunny weather, and out of nowhere I came across this breathtaking treehouse just next to a tiny road!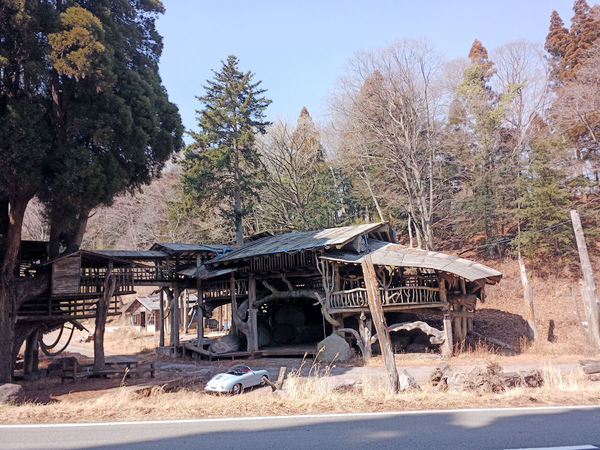
2016年の地震までは結構有名だったみたいですが、地震の時から残念ながらメンテナンスは行われていないそうです。ということは最近「立入禁止」の看板も表示されています。あっちこっちにダメージが見えましたので、中に入れなかったです。
It looks like it was built as a sightseeing spot and art installation a few years back, but suffered some damage in the big Kumamoto earthquake of 2016 (the one that toppled the famous castle). Since then it doesn't look to have been maintained at all, and some of the structure is rather weather-damaged.

外から見てだけでも面白かった!
In fact since it looks to be made solely of wood, some of the steps leading to upper levels and walkways have actually rotted away - leaving it looking quite precarious. They've got a few "Keep Out" signs in place, so for once I actually paid attention and didn't try climbing up to the balconies.
帰ってからネットで調べましたので、地震の前の状態が楽しそうだった!
If you get the chance, I'd recommend taking a good walk around the outside, before it collapses completely over the next few years. It's fascinating, and truly awesome in scale. I mean, look at the photo above .... It completely dwarfs my car - it looks like a toy!
Finally, here's a pic I found on the net of the treehouse complex in its heyday - doesn't it look glorious?!

Here's the map, for those that fancy exploring:
〒869-2226 熊本県阿蘇市乙姫2070-48
Aso City, Otohime 2070-48
Open from 13:00~17:00*
Fridays & Saturdays
(* if the door's closed, we might have popped out to walk the dog... back soon!)


")
Painted models available 塗装済の模型発売中!
Making garage doors ガレージの扉DIY作成
New side-project... a hobbit house! ホビットの家
Shops added to the shop ショップにお店
Repainting a (mini) car ミニカーのリペイント
Buying land in Otohime 乙姫で土地探し
Scale model of the Inaba Residence 稲葉家下屋敷の模型


 Shrine
 Temple
 Teahouse
 Castle
 Shops
Shops Houses
 Farm
Farm Other Buildings
 Walls & Fences
 Bridges
 Ponds
Ponds LED Lights
1 Comment :
32
2022-06-14 (Tue) 21:05PM
オープンが楽しみです
Write a comment :