


3D-Print Studio
やっと通信販売用ビジネスの準備ができました!3Dプリントのアトリエには最近看板、展示スペース、スタンプなどの用意ができましたので、間もなくフルタイムの3Dプリント工房をオープンいたします。
It's taken a lot of work to get to this stage, but at loooong last the 3D print studio is ready to open. Recent projects included making a shop sign, making display shelves, and 3D-printing a shop stamp for bags and shipping.
▲ 3台のプリンターでいろんなグッズが簡単に作れますが、まずは日本の模型モデルから始まります。
We have three 3D printers available for projects, and there's a massive variety of things that can be produced, but we're going to start with our very own range of designs of historical Japanese buildings and models.

▲ 商品の登録を今週から始めますが、ちょっとかかりますので少々お待ちください。最初の模型コレクションは「神社」です!ぜひ、ご覧ください。。。
To that end I've been busily redesigning this website to work as an e-commerce website, and I'll be adding more products over the coming weeks. To start with, please take a look at the new models from our Shrine Collection! Much more coming soon....
昨日の台風が大きかった!しかし、いつも暴風の天気なら車が心配ですので、今回いつもの所から移動しました。
Japan just had its 14th typhoon (for this year) yesterday, and this one rolled right up the middle of Kyushu. Since I haven't yet built a garage to keep my little blue car safe, it's always been covered by sheets and just parked outside the house.... which is always very worrying in strong winds!
Well, look what happened ....
▲ これがいつもの駐車場スペースですね。。。杉の木が台風で倒れたみたいですが、ちょうどあそこです!
See that large pine tree? That's been pushed over by the typhoon EXACTLY where my car is normally parked! Oh my goodness I am very, very lucky I moved it to somewhere safer!

▲ そのまま車があれば、おしまいかもね?確かにラッキー!
My car's only made of plastic fibreglass and has a soft roof, so if that tree had fallen on it that would probably have been a total write-off! Sometimes I feel very lucky :)
ハロウィーンはもうすぐです。コロナの影響で何年もイベントなかったし、今年がせっかくですので新しいコスチュームを作ろうかなぁ。。。
Halloween's coming up soon, and this will probably be my last opportunity to costume it up in a big city. Plus everything's been very quiet for the past few years thanks to the fun of coronavirus, so hopefully things will be a blast this year? So I've decided to create a new costume this year...

▲ 今年のハロウィーンでEdward Scissorhandsのコスチュームを作りたいです。80年代の映画だけで日本でも名作ですね。
This year I decided to try Edward Scissorhands, and the major part of that costume is of course those deadly scissor hands! That seemed a great opportunity to mix 3D printed technology, so I got to work.

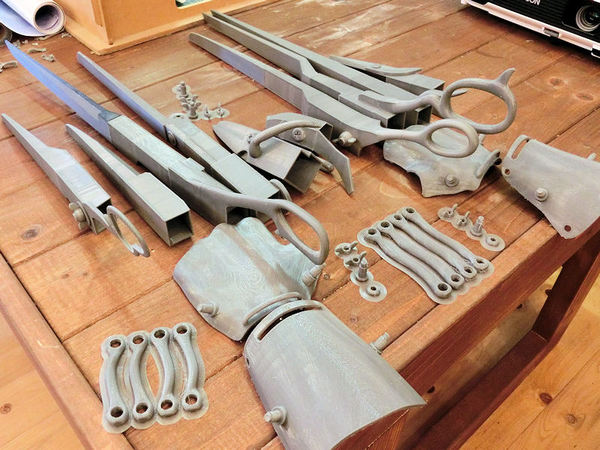
▲ 3Dプリント用のファイルをネットで見つけましたので、数日間でパーツをプリントしました。
I managed to find the print files online for free (costumers are lovely people!!), so I spent a few days printing out the various parts required.
https://www.myminifactory.com/object/3d-print-edward-scissorhands-articulated-glove-assemblies-11799
▲ 接着剤で指のパーツを組み合わせたら、こんな感じでした。想像できるでしょう?
With the multipart pieces for the fingers glued together, you can see them quickly taking shape.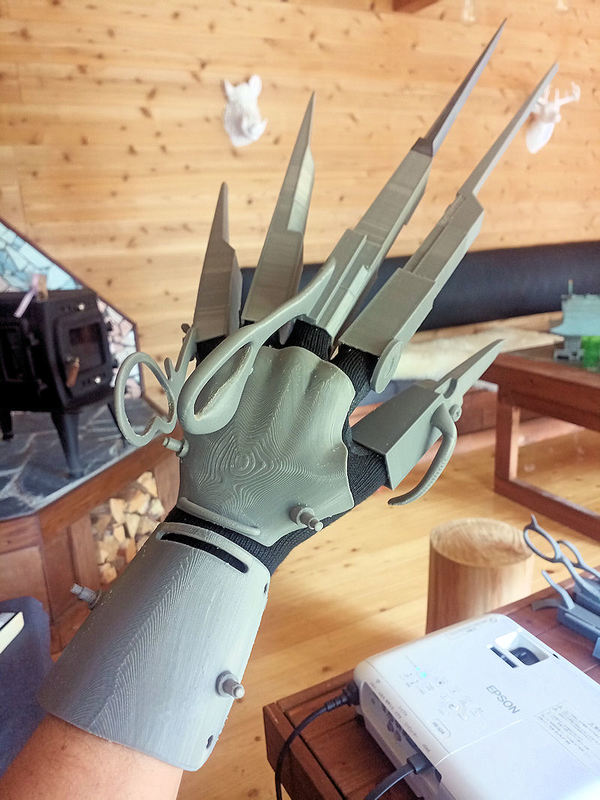
▲ 次はホットボンドで100円ショップで買った作業手袋に付けました。
Next I grabbed some cheap black plastic-coated work gloves from the local 100yen shop, and glued in each fingers with hot glue. Easy!

▲ 最後がペイントですね。まずは黒いスプレーの後にシルバーに塗りました。それからはさみのように赤いと黒い部分のアクセントと錆もしました。これで完成です!
Painting was the next step. I started with a simple black spray undercoat, and then painted on silver acrylic by hand. Then I went back over a few fingers and painted scissor grips in red or black, before weathering everything with a few scratches, and dabs of brown and orange for rust. All finished!
春に作ったEBikeには最近問題が発生しました。
The lovely eBike I converted to electric in the spring has hit a few problems recently.
▲ モーターからチェーンが2回外れましたが、2回目にコグが爆発しましたのでもう使えない状態です。同じ風に修理したらまた同じ問題が発生する可能性がありますので違う形のモーターに変更します。
The chain flew off the rear motor twice (it was a couple of degrees off straight), and the second time the flywheel kind of exploded slightly, losing all the ball bearings inside. That's the brass bit in the middle of the photo. So even if I replace that part, it's possible that it might happen again at some point, and it might be a loooong walk home.

▲ 今回フロントホイール用のモーターを付けます。モーターがホイールの真ん中に付けないといけないので、スポークの付け替えも必要です。YouTubeのビデオを見ながら変更いたしました。
ますは前の長いスポークをすべて外しました。
So I decided to try a front-hub motor this time. The previous motor was connected to the rear wheel via a chain system, but this new one (from AliExpress again) fits right into the centre of the front wheel instead. Unfortunately that means you either have to buy one already mounted into the correct size of wheel, or replace the spokes on the existing wheel to fit the new motor.
After checking some YouTube videos, I was fairly confident this could be done easily-ish, so I removed the front wheel and unscrewed all of the old spokes.

▲ ビデオのとおりにモーターを真ん中に置いて新しいスポークを入れました。
The new spokes are shorter, to fit the bigger motor in place of the slim axle, and I had to guesstimate the length (using an online calculator) and order some from Amazon. Then, following video instructions, I started to add spokes...

▲ スポークを注文したときにできるだけ正しい長さで計算しましたが実は5mmほど長すぎでした。空気入りタイヤならパンクになる恐れがありますが、去年ソリッドタイヤ―に変更しましたので、パンクなれないタイプです。ラッキー!
... and eventually all 36 spokes were in place. Then it was a fairly easy matter of placing the wheel back on the frame and systematically tightening up the spokes in turn, to true the wheel and remove wobbles. My spokes turned out to be about 5mm too long, and normally this means they would protrude inside the wheel and potentially puncture your inner tube. Happily, I switched these tyres out for solid ones last year (I was tired of constant flat tyres), so they are puncture-proof. Yay!

▲前と比べたらモーターが小さくて軽いですので、カッコよくなったですね。パワーが同じ350Wです。急な坂道の所にちょっと足も使わないと早く進めないんですが、満足です。
Compared to the previous chain-driven rear motor, this fronthub motor is lighter, quieter and smaller, and I was still able to use the existing batteries, throttle switch and cables. The power (350W) is the same, which means I need to add a bit of pedalpower on steep slopes to keep it moving along, but I'm still very happy with it. With a top speed of somewhere around 35km/h, it's great fun!
庭の作業がすごい時間かかったが、やっと終わりました。写真日記で見ましょうか。。。
It's taken a really, really long time, but the garden has now been mostly completed! So let's take a look back at how it first looked 3 years ago...
▲ 2019年:買った頃の状態。あっちこっちに小さい木とジャングルのような植物が多かったです。家の正面はほとんど見えませんね!
This is how the house and garden looked back in 2019, when I first bought the property. Most of the ground floor is hidden behind loads of small trees and jungley shrubs!

▲ 道から見ると大きい窓も見えないんだ!
This was the view from the street. You can't even see the 4 large windows that now lead onto the deck!

▲ 家がよく隠れていますね。やはり買いたい方は少ないと思う?
It's not really a surprise that the weeds all grew up so fast in 3 years of abandonment, and also not really a surprise that nobody else wanted to tackle the project!

▲ 現在デッキがあるところにレンガの花壇もありました。
This was the original view of how the side of the house looked. The brick and concrete flower beds all needed to be smashed apart before I added the deck there.

▲ 2021年夏: 中のリフォームがほとんど終わりましたので、家を赤にペイントしました。そして、デッキを作ったときにも植物を一応切ったが雑草が多かったですね。
右側にある植物が全部竹でしたので、まずはそれを抜きました。
Jumping forward two years, this was how the house looked in the summer of 2021. The interior had mostly been completed, the deck had been built around the front and side of the house, and the house had been painted red. I cut back most of the shrubs and small trees while I was building the deck, but it's still a mess!
The area to the right of the steps (where Katie is standing in this photo) was a big thicket of young bamboo, and it took quite a bit of work to dig down deep enough to pull out all those root systems.

▲ 2021年秋にこっちに芝生の種を広げましたので、数か月後にこんな感じになりました。大満足!
Once the bamboo thicket had been removed, I seeded the soil with grass seeds, and after a few months and a few more quick bouts of weeding to remove the last of the tough bits, the grass popped up nice and thick.
So I was very happy with that, and it was time to move on to the rest of the garden!

▲ 2022年春:やっと道揃えの庭から根を抜けました。34本の木根もあったので結構時間かかった。
In the spring of 2022 I started work on pulling all the tree roots and bushes out. I counted 34 root balls in total, which were a pain in the ass to remove! Many were over half a metre deep and wide!

▲ そして、約1トンの石も拾いました。過去にはあっちこっちに置いていたみたい。
In addition to the backbreaking process of removing roots, I also shifted about 1 ton of random rocks, which had been buried at various locations around the space - I think they were used to mark paths and edges. They were also a complete pain to dig out and haul away!

▲ 根と石を取ったら、好きな紅葉を買いました。愛車が軽トラックのように便利だった!
With all that mess removed, I could start adding in a few young saplings. I love Japanese maples (acer), especially in autumn, so I found this beautiful red one at my local DIY store, and got some very funny looks driving it home in my .... er..... multipurpose pick-up truck!

▲ 2022年夏:紅葉を道ぞろえに植え付けてから芝生の種をまきました。ちょうど梅雨の前ですので、いいタイミングだ!
Finally, by the summer of 2022, the land had been more or less flattened out, and a few small maple trees added. Then it was time to sprinkle several bags of grass seeds around, and wait for rainy season to start!

▲ 道から見るとこんな感じ。。。緑になったら最高!
Here's the view from the road, looking north. Hopefully all that brown soil will turn to green grass in a few months...

▲ 杉の間にハンモック!
After relocating that green maple tree nearer to the road, I was able to string a hammock between the two giant cedar-pines.

▲ 緑色と赤い紅葉が大きくなったら、素敵だと思う!
I'm hoping that these maples will grow up and spread out nicely, to make a gorgeous autumn canopy of greens and reds.

▲ 種をちょっとずつまきましたので、まだ植えている線が見えますね!
とりあえずこれで行こう!あとは雨を待つしかないです。
As you can see, the grass seed has been added in patches, but hopefully the lines between sections will disappear soon?
I think I'm done with the garden for the moment, but I'll add some flower beds along the side of the deck at some point, and start growing herbs and flowers there. But that's a job for next year....
〒869-2226 熊本県阿蘇市乙姫2070-48
Aso City, Otohime 2070-48
Open from 13:00~17:00*
Fridays & Saturdays
(* if the door's closed, we might have popped out to walk the dog... back soon!)


")
Painted models available 塗装済の模型発売中!
Making garage doors ガレージの扉DIY作成
New side-project... a hobbit house! ホビットの家
Shops added to the shop ショップにお店
Repainting a (mini) car ミニカーのリペイント
Buying land in Otohime 乙姫で土地探し
Scale model of the Inaba Residence 稲葉家下屋敷の模型


 Shrine
 Temple
 Teahouse
 Castle
 Shops
Shops Houses
 Farm
Farm Other Buildings
 Walls & Fences
 Bridges
 Ponds
Ponds LED Lights
0 Comments :
Write a comment :