


3D-Print Studio
| << Customer pics お客様作品の写真 2024-06-17 | No more car park! 駐車場がなくなった! >> 2024-10-09 |
ガレージができてから結構時間たちましたね。扉の作成はなかなか時間かかりましたが、やっと完成です!
It's been months and months since I built the garage, but it's been hard to find the time to finish the front doors. But with typhoon season coming soon, it was time to get started.

▲ 大体こんな感じで作るつもりでした。
This was the style of door I was aiming for, and I'd have to make it myself! Yikes.

▲ お風呂の扉と同じように両開きの折るタイプにしたいですね。
I wanted the doors to open inwards, so they could be left open most of the time. I like looking at my car when I walk past with Katie! So I came up with this bi-fold door design, with large windows for the top half of each door.

▲ まずは2x6と2x8のパインで長さを計算して、切りました。
The only wood available to me for this project in the sizes I needed was 2x4 pine, so I cut these 2x6 and 2x8 pieces to size.

▲ 横のパーツにほぞを作りました。ルーターでできましたが結構時間かかりました。
I decided to try mortise and tenon joints for the first time for this project, and cutting these tenons with just a narrow router was quite a time-consuming job!

▲ ほぞ穴もルーターでできました。
The mortise joint holes were similarly carved out with the use of a cheap router, and a jig frame to make sure each one was identical.

▲ 全部のパーツにできたらちょっとだけ安心しました!
It did feel pretty good to have all the pieces carved and laid out like this.
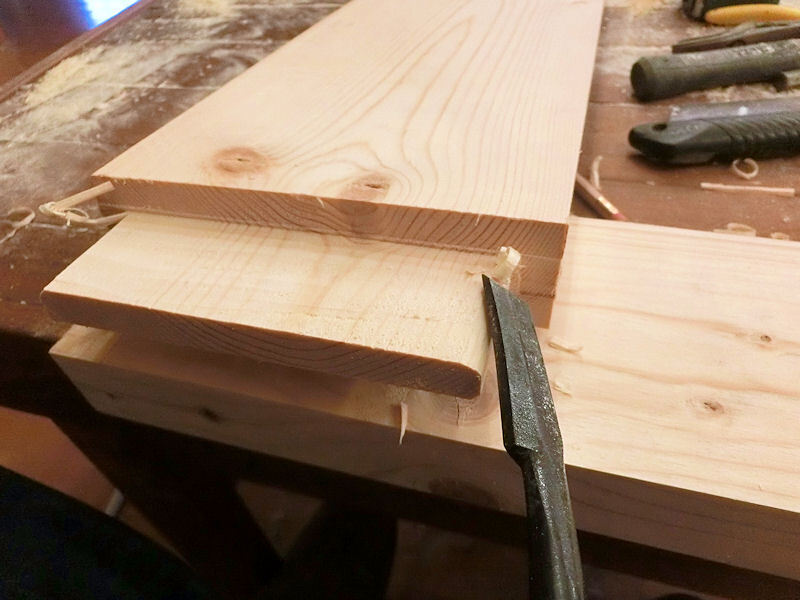
▲ そして、ほぞ穴にぴったりフィットするためにほぞの形をノミで綺麗にしました。
Next job was to carefully chisel away the shoulders of the tenons, to give them the best fit in each mortise hole.

▲ テストフィットが成功だ!やった!
The test fitting of all the pieces seemed to work okay!

▲ 次は窓ガラスのために穴を作りました。
Next step was to cut insets at the top and bottom of each door, for wood panelling and the large glass sheets. These were hand-finished with a chisel again.

▲ 木材ボンドで固定したら、だいぶ進んだという感じでした。
After adding chamferred edges to each piece with a router (to make it look prettier), it was time for glue and clamps!

▲ この扉にはビスなどは使わずに木材だけで作りますので、各ジョイントに穴を開いて木材棒を入れました。
These doors aren't held together with any screws, but instead rely on tight fitting joints and glue, but drilling these holes and hammering wooden dowel pegs through each joint gave me extra piece of mind.

▲ 最後にはその棒を切って、サンドペーパーで綺麗にしました。
Then it was a quick job to cut off each peg dowel and then sand it flat.

▲ 扉の形をこれから斜めにならないようにサポートも入れました。
The diagonal support in the lower half of each door should prevent it from sagging over time.

▲ 下の半分には床用の木材を入れました。薄いし軽さが大事でした。
The bottom half of each door was then fitted with thin tongue-and-groove floor panelling.

▲ ペイントの準備が始まりますので、穴にパテを入れました。
It was almost time for paint, so I went round filling in cracks, holes, and scratches with wood putty.

▲ 最後にはサンダーで全面をきれいにしました。
Then it was time for some very messy sanding, outside in the shade!

▲ 塗装は2~3回ほど塗りました。
The paint took 2 or three coats to make it reasonably smooth.
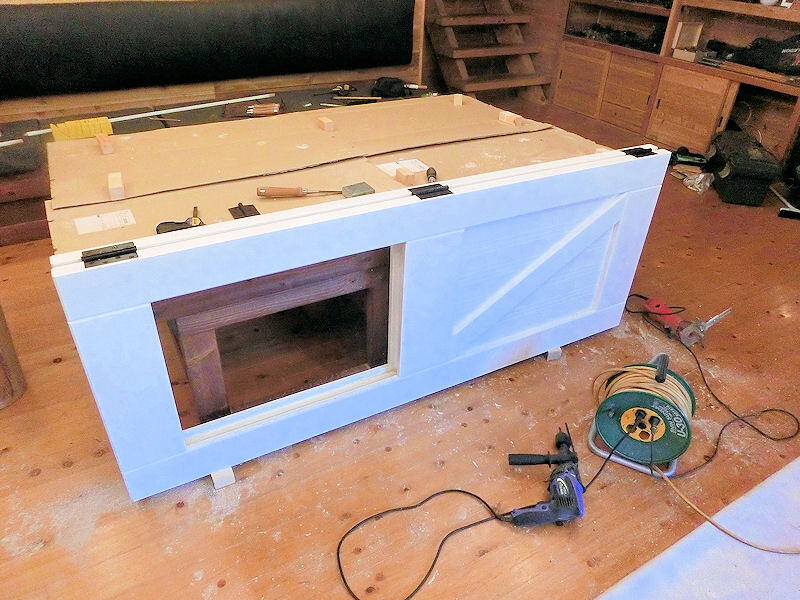
▲ これが大事ですね - 金具を付けました。そのあと各ペアの扉をガレージにやっと付けました。最後にガラス板と防水用のシリコンを付けました。
Some heavy-duty hinges were used to join doors into pairs, and then these were lugged outside and carefully fitted to the garage doorway. The last jobs were some paint touch-ups, fitting the glass into the frames, and then sealing it against water ingress using clear silicon.

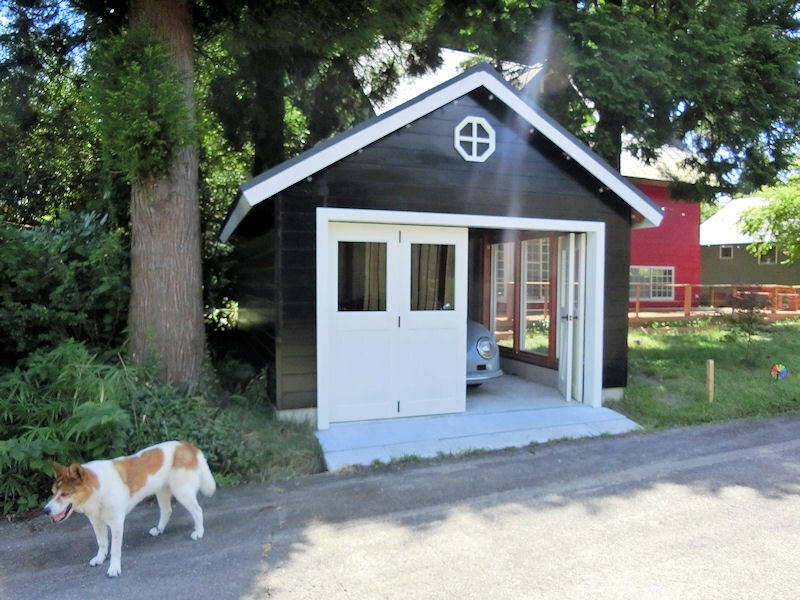
▲ やっと完成だ!
Job done!
▲ 左側の扉を閉じるとこんな感じ!
It was a little nerve-wracking swinging the first pair of doors closed for the first time, but they cleared the frames and ground nicely. Phew!

▲ 裏側に鍵も付いていますので、嵐でも大丈夫そうです。
The inside of the doors are fitted with long bolts top and bottom, to hold them steady against strong winds.

▲ 結局、完成のままです!大成功!
Finally, my lovely little car can rest safe and secure!
| << Customer pics お客様作品の写真 2024-06-17 | No more car park! 駐車場がなくなった! >> 2024-10-09 |
〒869-2226 熊本県阿蘇市乙姫2070-48
Aso City, Otohime 2070-48
Open from 13:00~17:00*
Fridays & Saturdays
(* if the door's closed, we might have popped out to walk the dog... back soon!)


")
阿蘇山の3D地図テーブルを作ってみた! I made a 3D MAP table!
3D阿蘇カルデラはいかがですか? 3D Maps added to the shop
Painted models available 塗装済の模型発売中!
Making garage doors ガレージの扉DIY作成
New side-project... a hobbit house! ホビットの家
Shops added to the shop ショップにお店
Repainting a (mini) car ミニカーのリペイント
Buying land in Otohime 乙姫で土地探し
Scale model of the Inaba Residence 稲葉家下屋敷の模型
Customer request - Pokemon Ball! ポケモンボール
Garage construction ガレージ工事 PART 6
Secret Aso-volcano pool 阿蘇山の隠れプール
Garage construction ガレージ工事 PART 5
Garage construction ガレージ工事 PART 4
Garage construction ガレージ工事 PART 3
Garage construction ガレージ工事 PART 2
Garage construction ガレージ工事 PART 1
Making a capiz shell wall light カピス貝殻壁掛けライト
Making a rustic antique-style wall light アンティークなライト作成
Making a capiz shell chandelier カピス貝殻シャンデリア
Online store opening sale グランドオープンの割引
Opening a webstore 通信販売サイトを開店します!
A lucky escape with the typhoon! 台風がヤバいけどラッキー!
E-bike conversion DIYで電動自転車を作った!
$200 Underfloor heating 2万円でDIY床暖房
3D-printed OPEN/ CLOSED sign アトリエ看板作成


 Shrine
 Temple
 Teahouse
 Castle
 Shops
Shops Houses
 Farm
Farm Other Buildings
 Walls & Fences
 Bridges
 Ponds
Ponds LED Lights