| << Garage construction ガレージ工事 PART 2 2023-07-30 | Garage construction ガレージ工事 PART 4 >> 2023-08-20 |
先週の基礎が乾いてからペースが上がりました!今回の作業はブロック壁です。木材壁のベースとして使います。
Last week's foundation concrete has now completely dried, so it's time to move on to the next stage - making a low block wall which will act as the base for the garage. From here on, things should speed up considerably!

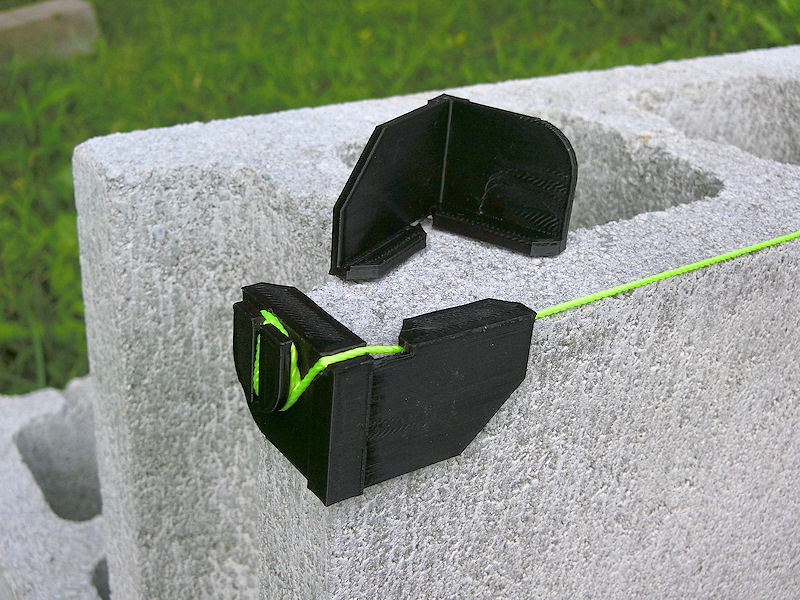
▲ まずは必要な道具の準備でした!ブロック壁を作るにはまっすぐのひも線がおすすめですが、近くのDIY店でなかなかいい道具はなかったので、パソコンでデザインして3Dプリンターで作りました。写真のような感じですね。デザインは1時間、プリントは2時間かかりましたが、やはり便利ですね。ダウンロードファイルはこちらです。
First thing to do was to assemble some basic tools; a couple of trowels, a bucket, and 33 concrete blocks. When laying a concrete block wall, it's important to be able to align the entire wall correctly, and for that you need to set the corner/ends of the wall in mortar, and use a string guide. Unfortunately I couldn't find any handy guide tools in my local DIY shop, so I quickly knocked up a pair of brackets on the 3D printer. It took an hour to design the parts, and another couple of hours to print them - but they work magnificently! A 3D-printer is such a useful machine to have available for making stuff like this!
The files are available on Thingiverse here, for anybody who wants to print them.

▲ ブロック壁用のセメントをちょっとづつ並べて、ブロックを置きました。この作業は初めてでしたが、YouTubeのビデオの通りにできました。乾いたら、写真の様になりました。入口への坂はあとで作りますので、まだ車を入れないところですね。その代わりにDIY店「ハンズマン」から木材と瓦材の配達をあそこにとりあえず置きました。
I've never done block walls before, but a couple of useful YouTube videos gave me the basics, and it turned out pretty good, I think. It tooks about 4 hours to do all the walls, setting 2 or 3 blocks at a time. The string guides were super useful!
As you can see in the photo, I still haven't added a slope for the entrance, so I'm unable to park my car there for now. Instead, I've stored some of the big sheets of wood board and rooftiles, which were delivered by a truck from my local DIY shop Handsman. The driver kindly helped me unload them, and he commented that the house has come on a treat since he delivered the wood for the deck a couple of years ago. Encouraging!

▲ 明日から台風が来そうですので、次の作業は早めにしました!鉄のピンと壁用のボルトをブロックの穴に入れて、コンクリートで固定できました。今回は約100キロのコンクリートは自分で混ぜましたが、隣の優しいTeruさんからミクサー道具を借りました。助かりました! Thank you, Teru!
We've got the first typhoon of the season coming in the next couple of days (a few weeks early this year!), so I rushed a little to finish the work on the block wall. That involved strengthening some of the joins and rebar inserts with concrete, and also setting in the big brass bolts that will anchor the walls to the base.
I bought 100 kilograms of dry concrete in bags, added water, and quickly mixed them up and poured. My lovely neighbour Teru lent me an electric hand mixer, which worked brilliantly in quickly mixing buckets of concrete 10kgs at a time.

▲ これで基礎とブロック壁が完成ですので、次は壁のフレーム作成ですね!楽しみにしています!
With that done, and everything battened down for the typhoon, the base is complete! The next job will be to create the wooden frames for the wall - which I've been looking forward to doing for ages!
予算は4万円でした。。。
ブロック33個: 7,923円
セメント60kg: 2,860円
コンクリート100kg: 4,840円
道具: 664円
ボルトなど: 5,006円
基礎パッキン911mm x 15個: 6,150円
合計: 27,443円
My budget for this wall was 40,000yen, and happily I came in under budget again!
33 concrete blocks: 7,923yen
Cement bags 60kg: 2,860yen
Concrete bags 100kg: 4,840yen
Tools: 664yen
Brass bolts, nuts, rebar etc: 5,006yen
Plastic vent brackets 911mm x 15: 6,150yen
Total 27,443yen
| << Garage construction ガレージ工事 PART 2 2023-07-30 | Garage construction ガレージ工事 PART 4 >> 2023-08-20 |
〒869-2226 熊本県阿蘇市乙姫2070-48
Aso City, Otohime 2070-48
Open from 13:00~17:00*
Fridays & Saturdays
(* if the door's closed, we might have popped out to walk the dog... back soon!)


Painted models available 塗装済の模型発売中!
Making garage doors ガレージの扉DIY作成
New side-project... a hobbit house! ホビットの家
Shops added to the shop ショップにお店
Repainting a (mini) car ミニカーのリペイント
Buying land in Otohime 乙姫で土地探し
Scale model of the Inaba Residence 稲葉家下屋敷の模型